Golden Demon – Forgeworld Best in Show!

After convincing myself that I wasn’t going to place in the Golden Demon, I was happy to win the Forge world Best in Show and the silver demon for vehicle behind the amazing Karol Rudyk. The quality of entries for this Golden Demon were the highest I have ever seen!

Here are the photos of my finished knight lancer. Click on the images below for larger versions.

The Cerastus Knight-Lancer is a first strike weapon, attuned to rapid assault tactics and lethal outflanking charges against a foe. It is justly renowned for its speed and its power, as well as for the temperamental and restive nature of the machine-spirits which dwell as anima within its colossal frame.

Forgeworld Best in Show

I modified this model to allow for the larger area of freehand on the shield (seen above!). Here is how it would have originally looked:

Forgeworld Best in Show

You can follow along in with a step-by-step tutorial on how I converted the shield and created the freehand on my Forgeworld Best in Show winning lancer, here! :

More photos of my lancer can be found on the Golden Demon website (click here to view).

Want to win a Forgeworld Best in Show, too? Lots of freehand tips and video tutorials are available on the website for members – click below to watch!

Freehand Tutorials for Members

Freehand
How to Paint the Nagash Helmet
My detailed how to paint the Nagash helmet tutorials, with videos plus step by step guide and tips with full paints used. Video – How to Paint the Nagash Helmet Part OnePaints and Materials UsedPaintsBrushesOther MaterialsSteps and Tips on How to Paint the Nagash HelmetVideo – How to Paint the Nagash Helmet Part TwoPaintsSteps and Tips on How to Paint the Nagash Helmet (Part Two)Video – How to Paint the Nagash Freehand Swirls/FiligreePaintsTips for the Freehand FiligreeVideo – How to Paint the Nagash Helmet Leather Strips and RunesPaintsStep and Tips on How to Paint the Nagash Helmet Leather Strips and RunesFor all of my Nagash Tutorials in one place, go hereExplore More Nagash Technique Tutorials Video – How to Paint the Nagash Helmet Part One In this tutorial, we’ll focus on painting the metallic areas of Nagash, specifically the head. The colours used for this tutorial are a bit different from the standard, and in the video I discuss techniques in more detail to achieve a textured, refined finish. Paints and Materials Used Paints Vallejo: English Uniform (VX-88) Golden Olive (Elysian Green mixed with Yriel Yellow) Yellow Green (Dorn Yellow mixed with Moot Green) Ice Yellow (Dorn Yellow) Ivory (Screaming Skull) Games Workshop: Rhinox Hide Abaddon Black Naggaroth Night (for future use) Brushes Fine detail brush (suitable for intricate work and small highlights) Medium-sized brush (for larger areas and base coating) Wet palette (to keep paints fresh and workable) Other Materials Wet palette Green stuff (for sculpting additional details, if desired) Painting lamp (for consistent lighting during the painting process) Miniature holder (for ease of handling and painting) Steps and Tips on How to Paint the Nagash Helmet Prepare the Model: Ensure your miniature is assembled and primed appropriately for painting. I’ve used a black primer for my Nagash. Block in the Base Colour: Start by blocking in the main highlights using Vallejo’s English Uniform (VX-88). Apply this colour where you want the primary light source to hit, focusing on a top-left orientation.Be mindful not to make the colour too opaque; a slight texture is desirable for the metallic effect. Understanding Colour Choices: The choice of metallic colours doesn’t have to be conventional. For this model, I went for a dark and moody theme inspired by the artwork of Nagash.My chosen metallic shades include Golden Olive, Yellow Green, and Ice Yellow from Vallejo, along with Rhinox Hide and Abaddon Black from Games Workshop. Building Layers of Colour: Use Golden Olive to build layers on top of the English Uniform, focusing on areas that require additional depth and shading.The opacity of Vallejo paints allows for strong, defined marks, ideal for creating small details and textures. Creating Texture and Depth: With each layer, gradually introduce lighter shades such as Yellow Green and Ice Yellow to enhance highlights and add dimension to the metallic surfaces.Keep in mind the direction of light and focus on maintaining a balance between light and shadow. Understanding Volume and Light: Highlighting metallic surfaces requires understanding how light interacts with volume. Unlike standard blending techniques, aim for distinct contrasts between light and shadow. Make sure you consider how light reflects off different surfaces, creating highlights and shadows of varying intensities. I like to use lots of real-life references of metal to study as I paint. Achieving a Moody Atmosphere: For an undead character like Nagash, aim for a dark, desaturated overall appearance. Use strong, small highlights strategically to draw attention to focal points. Avoid smooth blending; purposefully textured painting adds depth and character to the model. Experimenting with Glazing TechniquesExperiment with glazing techniques to blend colours seamlessly and soften transitions between different areas of the model.Glazing allows for subtle colour adjustments and can help unify the overall color scheme, creating a harmonious visual effect. Video – How to Paint the Nagash Helmet Part Two In this part, we’ll focus on painting the skull face, hair, and bone structures atop the hat. Paints Vallejo Model Colour: English Uniform (VX-88), Golden Olive (Elysian Green mixed with Yriel Yellow), Yellow Green (Dorn Yellow mixed with Moot Green), Ice Yellow (Dorn Yellow), Ivory (Screaming Skull), Neutral Grey (Mechanicus Standard Grey), Pale Grey Blue (Grey Seer mixed with Blue Horror) Games Workshop: Rhinox Hide, Warpstone Green Contrast, Deathclaw Brown P3: Morrow White Steps and Tips on How to Paint the Nagash Helmet (Part Two) Paint the Bone Structures: Using Vallejo’s English Uniform (VX-88), begin by painting the bone structures on top of the hat. Focus on picking out the highlights, keeping in mind the top-left orientation of the light source. Apply the paint carefully to emphasize the edges and contours of the bones.Enhance the Bone Texture: Utilise Golden Olive (a mix of Elysian Green and Yriel Yellow) to add depth and shading to the bone structures. Concentrate on areas that require additional definition, such as the joints and sockets. Remember to maintain a balance between light and shadow to create a realistic, textured effect.Add Highlights: With Yellow Green (a mix of Dorn Yellow and Moot Green), further highlight the bone structures, focusing on the areas where light would naturally hit. Pay attention to the left-hand side of the model to create a stronger contrast and emphasise the lighting direction.Refine the Highlights: Using Ice Yellow (Dorn Yellow), continue to build up the highlights on the bone structures, especially on the left-hand side. Gradually increase the brightness of the highlights towards the center of the model to draw attention to focal points.Adjusting with Rhinox Hide: If necessary, use Rhinox Hide to refine any areas where you’ve made mistakes or to add depth to the shadows. The translucency of this paint allows for easy blending and adjustment while maintaining a natural look.Painting the Skull Face: For the skull face, start with Deathclaw Brown, focusing on creating a weathered, textured appearance. Apply the paint in a rough, uneven manner to mimic the natural wear and tear of ancient bones.Highlighting the Skull: Gradually add highlights to the skull using Morghast Bone. Concentrate the highlights towards the left-hand side of the face to maintain consistency with the overall lighting scheme. Ensure the highlights stand out against the darker base colour to create depth and dimension.Adding Detail to the Eyes: Use a small amount of Morghast Bone to pick out the details around the eyes, emphasising the cheekbones and brow ridge. Be mindful of the sculpted eye sockets and adjust the highlights accordingly to enhance the overall appearance.Painting the Hair: Begin painting the hair with Neutral Grey, focusing on the large, clumpy strands. Keep the highlights towards the top side of the hair to simulate light hitting the surface. Apply the paint in a rough, textured manner to achieve a realistic look.Adding Texture to the Hair: Continue to build up the texture of the hair using Pale Grey Blue. Emphasize the highlights on the top side of the hair while leaving the underside darker to create depth and volume.Refining the Highlights: Using Morrow White sparingly, refine the highlights on the hair strands to add contrast and dimension. Focus on the areas closest to the face to draw attention to the focal points. Video – How to Paint the Nagash Freehand Swirls/Filigree Paints Vallejo: English Uniform (VX-88), Golden Olive (Elysian Green mixed with Yriel Yellow), Yellow Green (Dorn Yellow mixed with Moot Green), Ivory (Screaming Skull), Neutral Grey (Mechanicus Standard Grey), Pale Grey Blue (Grey Seer mixed with Blue Horror)Games Workshop: Warpstone Green Contrast, Abaddon BlackP3: Morrow White Tips for the Freehand Filigree Base Coat: Apply a base coat of Vallejo English Uniform (VX-88) to start the filigree on the Nagash hat. Ensure even coverage and allow it to dry completely. Highlighting with Yellow-Green: Mix Vallejo Yellow Green (Dorn Yellow mixed with Moot Green) with a small amount of white to increase opacity. Use a fine tip brush to apply highlights to what would be the raised areas of the filigree. Focus on creating sharp lines and highlights to enhance the detail. Adding Ivory Highlight Dots: Using Vallejo Ivory (Screaming Skull), create small highlight dots on the filigree. These dots should be strategically placed on curves and extreme curve points to simulate shine and reflectivity. Ensure consistency in placement for a cohesive look. Enhancing Contrast with Black: With Games Workshop Abaddon Black, carefully outline the filigree details to enhance contrast and definition. Use a fine tip brush and steady hand to create clean lines and borders. Glazing with Warpstone Green Contrast: Thin Games Workshop Warpstone Green Contrast with water (about two parts water to one part paint) to create a glaze. Apply the glaze over the filigree to enhance shading and highlights. Final Touches: Use P3 Morrow White to add final highlights to the filigree, focusing on the most raised and reflective areas. Ensure consistency and restraint with the white highlights to avoid overpowering the overall effect. Video – How to Paint the Nagash Helmet Leather Strips and Runes By following these steps and techniques, you can effectively paint leather strips and runes on your Nagash (or any other model, really!) adding depth, texture, and character. Paints Games Workshop: Rhinox Hide, Mournfang Brown, Cadian Fleshtone, Temple Guard Blue, Barroth Blue. Step and Tips on How to Paint the Nagash Helmet Leather Strips and Runes Base Coat: Ensure that the leather strips on the Nagash helmet are properly primed with black primer. Once primed, apply a base coat of Games Workshop Mournfang Brown to the leather strips. This will serve as the foundation for the leather texture. Highlighting with Mournfang Brown: Using Games Workshop Mournfang Brown, begin highlighting the curves and raised areas of the leather strips. Apply the paint in a textured manner, focusing on creating depth and dimension to simulate the appearance of weathered leather. Don’t worry about perfect blending; imperfections add to the realism. Layering with Cadian Fleshtone: Next, switch to Games Workshop Cadian Fleshtone and continue highlighting the leather strips. Apply this paint more sparingly, focusing on the most raised areas and curves to enhance the texture. The tonal contrast between Mournfang Brown and Cadian Fleshtone will create depth and visual interest. Glazing with Rhinox Hide: Thin Games Workshop Rhinox Hide with water to create a glaze. Apply the glaze over the highlighted areas to tone down the highlights and add depth to the leather texture. Focus on applying the glaze in the shadowed areas and along the edges of the leather strips for a realistic look. Painting Runes: Using Games Workshop Temple Guard Blue and Barroth Blue, paint the runes onto the leather strips. Ensure that the runes are clearly visible and neatly painted. Use a fine tip brush and steady hand to create clean lines and shapes. Less is more; avoid overcrowding the leather strips with too many runes to maintain balance. Touching Up: Review the painted leather strips and runes, making any necessary touch-ups or adjustments. Ensure consistency in highlighting placement and rune design throughout the miniature model. For all of my Nagash Tutorials in one place, go here Nagash, Supreme Lord of the Undead Nagash, Supreme Lord of the Undead is the father of necromancy.  I created a series of detailed tutorials on how I painted him. Watch Now Explore More Nagash Technique Tutorials If you don’t have an account here on my website, please sign up here! I have over 350 video tutorials with steps and tips, plus a selection of PDFs. If you are not sure about joining, you can explore my free videos with a free membership, or take the plunge and become a full subscriber for full access. If you’d prefer to support me on Patreon, please visit: https://www.patreon.com/RichardGray [...]
How to Paint Chaplain Ribs Freehand
How to freehand ribs on the new Terminator Chaplain that Games Workshop sent me for review. I know some people were disappointed that it didn’t have sculpted on ribs, so this should fix it! This guide should help you add a striking rib detail to your Chaplain Terminator, enhancing its visual impact and bringing it closer to the iconic Chaplain imagery. Video: How to Paint Chaplain Ribs Freehand Materials Required: Paints: Games Workshop XV-88, Morghast Bone, Screaming Skull, Rhinox Hide; Vallejo Neutral Grey; P3 Morrow White; Kimera Colours Black Brushes: A variety of sizes for detailed work Milliput or Sprew Glue: For filling and smoothing the chest area Sandpaper: For sanding down the filled areas Palette and Water: For paint mixing and brush cleaning Steps for Freehanding Ribs: 1. Preparation: Fill the chest holes with Milliput or Sprew Glue. Sand down to create a smooth surface. Be patient and allow adequate drying time to avoid issues. 2. Base Painting: Begin with a base coat of XV-88. This will be your primary rib colour. Ensure the background remains a flat black for high contrast. Chimera Black is recommended for its matte finish and good coverage. 3. Adding the Ribs: With XV-88, sketch out the shape of the ribs. Remember, space is limited, so it’s more about suggesting ribs rather than anatomical accuracy. For human-like ribs, remember that Space Marines are portrayed with fused ribs, but standard human ribs are usually depicted on Chaplains for visual impact. 4. Shading and Detailing: Use Rhinox Hide to create shadows and define the separation between ribs and sternum. This paint can be applied translucently to allow underlying colours to show through, adding depth. 5. Highlighting: Progressively add highlights with Morghast Bone. Focus on the front of the ribs, gradually reducing intensity towards the sides. Add fine details and further highlights with Screaming Skull, but use sparingly to avoid excessive brightness. 6. Refining: Use Neutral Grey and Morrow White for subtle colour variations and additional highlights. Keep refining the details until you achieve the desired level of depth and realism. Use black paint to clean up any errors and sharpen the edges of the ribs. 7. Finishing Touches: For the sternum, devise a suitable design that complements the ribs. This might include fused elements or socket-like features. Tips: Asymmetry: Deliberately make the ribs asymmetric for ease of painting and to avoid the challenge of perfect symmetry. Light Source: Consider the model’s overall lighting when placing highlights to maintain consistency. Take Your Time: With freehanding, patience is key. Build up layers gradually and refine as needed. By following my “How to Paint Chaplain” guide, you’ve now mastered the art of freehanding rib details, enhancing the iconic look of your miniature. Check out more of my freehand tutorials, below, for more ideas for your next project. More Freehand Videos If you don’t have an account, please sign up here! The website currently has over 350 video tutorials with steps and tips, plus a selection of PDFs. If you are not sure about joining, you can explore my free videos with a free “freebies” membership, or take the plunge and become a full subscriber for full access. If you’d prefer to support me on Patreon, please visit: https://www.patreon.com/RichardGray [...]
How to Paint a Simple Freehand Dragon
This video shows how to paint a simple freehand dragon on the inside of a shield, in this case I did it to add extra detail to a Golden Demon entry. Video – How to Paint a Simple Freehand Dragon Paints and Materials The following paints were used:Games Workshop: Rhinox Hide, Mournfang Brown Vallejo: German Grey, Neutral Grey, Ice Yellow, White Step-by-Step Guide and Tips for the Freehand Dragon Prepare the Surface: Begin by roughly painting the inside of the shield with a mixture of Mournfang Brown and Rhinox Hide from Games Workshop. These paints should be heavily thinned with approximately two parts water to one part paint. Use a large brush, like a size 2 artist opus brush, for quick and broad coverage. This base coat doesn’t need to perfectly match the shield’s front colour, as it will largely be covered. Apply Texture: The texture on the back of the shield differs from the front to differentiate it from the armor. Apply the paint in a scratchy manner to simulate wear and tear. For this, use Neutral Grey from Vallejo, mixed with Ice Yellow for highlights, and German Grey for darker areas. Remember, this part doesn’t have to be perfectly blended, as some roughness adds character. Glazing: If needed, glaze over the scratchy texture with more diluted Rhinox Hide and German Grey. Glazing helps to soften the texture and can hide any imperfections in the painting. Freehanding the Dragon: When painting the dragon, start with a reference photo of the dragon design on the shield’s front. This helps maintain consistency across the model. Use Vallejo Model Color Black for the dragon outline, ensuring the paint is well-diluted for fine lines. Brush Selection: Use a fine brush for detailed work. A worn-out brush might not give the sharp lines needed for intricate details. A newer, sharper brush is recommended for finer details and corrections. Highlighting the Dragon: Start with Neutral Grey for initial highlights. For more pronounced highlights, mix Neutral Grey with Ice Yellow, leaning more towards Ice Yellow for brighter highlights. Apply these highlights only to the upper edges of the dragon design, where light would naturally catch. Adjusting for 3D Effect: Paint the inside of the dragon with a darker grey, such as a mix of German Grey and Neutral Grey, to create depth and avoid a flat black appearance. Final Touches: Add fine highlights to the dragon, especially along the edges and raised areas, to enhance the 3D effect. Use a mix of Neutral Grey and Ice Yellow, and pure Ice Yellow for the brightest points. Be mindful of the shield’s orientation to ensure that highlights correspond to the light source. Painting the Shield Trim: Finally, paint the shield’s trim, likely in a gold or metal colour. This trim frames the dragon and gives a polished look to the shield, enhancing the overall appearance. More Tutorials and Tips on Freehand If you don’t have an account, please sign up here! The website currently has over 350 video tutorials with steps and tips, plus a selection of PDFs. If you are not sure about joining, you can explore my free videos with a free membership, or take the plunge and become a full subscriber for full access. If you’d prefer to support me on Patreon, please visit: https://www.patreon.com/RichardGray [...]
How to Paint a Nurgle Shield with Freehand and Shine
These videos show how to a paint a Nurgle shield with freehand for an Ogroid from the Slaves to Darkness army box.The freehand is if a Nurgle Plaguebearer head and is intended as a potential Golden Demon entry. Scroll down to explore the tutorials and steps in order, or click the below to quick jump to a technique or section. Video One: How to Paint a Nurgle Shield with FreehandPaints and Materials UsedPaintsBrushesOther MaterialsStep-by-Step Guide: PreparationBase PaintingFreehand SketchingRefining and DetailingFinal TouchesImportant NotesVideo Two: How to Paint the Shield Shine and NMM TrimPaints and Materials UsedPaintsBrushesOther MaterialsStep-by-Step GuidePreparing the PalettePainting the ShinePainting the NMM TrimFinal TouchesImportant NotesMore Freehand Tutorials to Explore Video One: How to Paint a Nurgle Shield with Freehand Paints and Materials Used Paints Games Workshop Paints: Rhinox Hide Bugman’s Glow Mournfang Brown Morghast Bone Deathworld Forest Yriel Yellow Khorne Red Ushabti Bone Vallejo Paints: Black Ice Yellow P3 Paint: Morrow White Brushes Artist Opus: Size 00 brushes (both a newer brush for finer details and an older brush for blending) Other Materials Wet Palette: To keep paints moist and workable. Scalpel: For removing details from the shield. Sandpaper: For smoothing the shield after using the scalpel. Primer: Ultimate primer (specifically thinned with X20A for this project). Mixing Water: For thinning paints on the palette. Matte Varnish: To even out the surface and finish of the paint job. Step-by-Step Guide: Preparation Prep the Nurgle Shield with Freehand: Remove intricate details from the shield using a scalpel and sand it slightly. Keep some battle damage for authenticity, if you wish. Prime the Shield: Use Ultimate primer, thinned with X20A, applied in 4-5 thin coats. Base Painting Wet Palette Setup: Prepare a wet palette with the following Games Workshop colours: Ice Yellow, Bugman’s Glow, Rhinox Hide, Mournfang Brown, Morghast Bone, Deathworld Forest, Yriel Yellow, Khorne Red, and Ushabti Bone. Also, have Vallejo Black and P3 Morrow White ready. Mixing Colours: Create various mixes of these colours on the palette, adjusting with water for a thinner consistency (approximately 50/50). Freehand Sketching Initial Sketch: Start sketching the Nurgle face on the shield using Bugman’s Glow. This doesn’t have to be symmetrical or realistic. Adding Details: Gradually add more details like eyes, horns, and facial deformations using the mixed colours. Use Rhinox Hide for shading. Background Technique: Use Vallejo Black as a ‘rubber’ to tweak and correct the sketch as needed. Refining and Detailing Light and Shadow: Use the lighter and darker mixes to create depth, focusing on the facial features. Ensure a balance between highlights and shadows. Adding Texture: Pay attention to the direction of brushstrokes to replicate skin texture and facial creases. Final Touches Metallic Effects: For a Golden Demon entry, ensure to incorporate light volumes and reflective effects on the shield, as well as on the freehand. Glazing: You may need to glaze over the freehand to integrate it with the shield’s overall shine and metallic effect. Varnishing: Finish the shield with a matte varnish to even out different paint finishes. Important Notes Brush Technique: Use the very tip of your brush for detailed work. Switch between an older brush for blending and a newer one for sharp details. Colour Importance: While exact colour mixes are flexible, ensure to maintain the overall desaturated, moody look characteristic of Nurgle. Patience and Layers: Build up the image with multiple thin layers, allowing for smooth transitions and a detailed finish. Personal Style: Remember, this guide is a base. Feel free to adjust and experiment according to your style. Video Two: How to Paint the Shield Shine and NMM Trim Paints and Materials Used Paints Vallejo Paints: Black German Grey Neutral Grey Ice Yellow White Games Workshop Paints: Mournfang Brown Brushes Size 00 Brush: Ideal for detailed work and fine textures. Used for most of the work including the shine and trim. Size 2 Brush: Used for broader strokes and glazing, especially over larger areas. Other Materials Wet Palette: To keep the paints moist and workable. Lamp: For observing how natural light falls on the model, crucial for accurate highlight placement. Blu Tack or Similar Adhesive: To temporarily attach the shield to the model for correct angle assessment. Step-by-Step Guide Preparing the Palette Setup Wet Palette: Prepare a wet palette with Vallejo Black, German Grey, Neutral Grey, Ice Yellow, White, and Games Workshop Mournfang Brown. Create a gradient of grey shades from black to white, mixing in Ice Yellow and White with Neutral Grey for various mid-tones. Painting the Shine Analyzing Light Direction: Position the model under a lamp to observe natural light fall. This will guide the placement of the shine. Initial Highlights: Start with a Neutral Grey or a mix of Neutral Grey and German Grey to block in the primary highlight areas on the shield. Building Up Layers: Gradually increase the brightness of the highlights, focusing on the top left as the primary light source. Remember, the paint will appear brighter when wet and duller when dry. Textured Effect: Use scratchy and stipple brushstrokes with minimal paint for a textured shine effect. Use the very tip of your brush. Bounce Highlight: Add a bounce highlight at the bottom of the shield, reflecting light from the ground. This should be less bright than the primary highlight. Use a watered-down Mournfang Brown for a glaze over this area. Painting the NMM Trim Blocking in Highlights: Use Neutral Grey to block in primary highlights on the trim, focusing on the top area. Adding Variation: Create a variety of light grey blocks along the trim, ensuring they get darker and more spaced out as they move away from the top highlight. Refining Highlights: Gradually add lighter tones, culminating in white for the brightest parts. Ensure these highlights align with the shield’s central highlight. Detailing Scratches: Use white to pick out tiny dots on sculpted scratches for added realism and depth. Bounce Highlight on Trim: Similar to the shield, add a less intense bounce highlight at the bottom of the trim. Final Touches Glazing: Apply a thin glaze of Mournfang Brown over certain areas for colour integration and smooth transitions. Detail Checks: Make any necessary adjustments to neaten the highlights and ensure consistency in lighting and texture across the shield and trim. Important Notes Consistency and Control: Maintain a good balance in paint consistency – not too thick for opaque marks and not too watery to avoid spreading. Brush Technique: Always pull the brush towards yourself for control and precision, especially important when working near the freehand area. Learning and Experimentation: Remember, this technique is both challenging and rewarding. Don’t be afraid to experiment and learn from the process. These guides should provide a clear roadmap to achieving a high-standard finish for your freehand on shields, suitable for display or competition. Remember, practice and patience are key to mastering these techniques and don’t be afraid to do your own thing and add your own personal touch or style to your freehand! More Freehand Tutorials to Explore If you don’t have an account, please sign up here! The website currently has over 350 video tutorials with steps and tips, plus a selection of PDFs. If you are not sure about joining, you can explore my free videos with a free membership, or take the plunge and become a full subscriber for full access. If you’d prefer to support me on Patreon, please visit: https://www.patreon.com/RichardGray [...]
How to Paint a Tiny Freehand Skull – Emperor’s Champion
This video shows you how to paint a tiny freehand skull for the tilt shield on the Emperor’s Champion. This method allows for a detailed, expressive freehand skull on a very small area. The key to success is starting with a central, smaller shape and gradually expanding and refining it, using thin layers and careful highlights to bring out the details. Video Tutorial : How to Paint a Tiny Freehand Skull Materials Needed The following paints were used:Games Workshop: XV-88, Balor Brown, Morghast Bone, Screaming Skull, Rhinox Hide, Mournfang Brown, Mephiston RedVallejo: BlackP3: Morrow White (Any White will do) Step-by-Step Guide Preparing the Shield Start with the tilt shield painted black. Use Mephiston Red to create a dividing line across the shield for a more knightly appearance and to provide a base for the freehand skull.Blocking in the Skull with XV-88 Use XV-88 to block in a rough lightbulb shape for the skull. Start smaller than needed, allowing room for adjustments. Focus on getting the skull centrally placed. Defining Eye and Nose Sockets Paint rough placements for the eye and nose sockets with a darker colour like Rhinox Hide. It’s okay if these aren’t perfect; they can be refined later. Adjusting and Refining Details Use XV-88 to adjust and refine the shape of the skull, especially the eye sockets. Pay attention to symmetry and expression. Shading with Rhinox Hide Thin down Rhinox Hide to apply subtle shading, enhancing the depth and texture of the skull. Focus on areas like brow ridges and cheekbones. Adding Highlights with Balor Brown Move to Balor Brown for the first stage of highlights. This should be done carefully to define key areas of the skull without overwhelming the small scale. Further Highlights with Morghast Bone and Screaming Skull Continue highlighting with Morghast Bone and Screaming Skull. These lighter colours bring out the details and add dimension to the skull. Detailing Teeth and Final Touches Paint the teeth, focusing on the front two as key features. Remember, at this scale, not all teeth need to be defined individually. Use the darker colours (like Rhinox Hide) to refine and adjust the shape and expression of the skull. Add final bright highlights with P3 Morrow White or similar, focusing on the most prominent parts of the skull. Painting a Halo (Optional) For additional flair, paint a small halo around the skull using Balor Brown and adding highlights with lighter colours, finishing with a dot of white for reflection. Finishing the Shield Once the skull is complete, use the armour colours to finish the shield’s background. This step includes weathering and adding transitions to blend the skull into the rest of the model. More Emperors Champion Tutorials If you don’t have an account, please sign up here! The website currently has over 350 video tutorials with steps and tips, plus a selection of PDFs. If you are not sure about joining, you can explore my free videos with a free membership, or take the plunge and become a full subscriber for full access. If you’d prefer to support me on Patreon, please visit: https://www.patreon.com/RichardGray [...]
How to Paint the Lady Annika Freehand Skull (and Boots)
In one of my previous videos I did a pattern on the dress for Lady Annika, The Thirsting Blade, but decided I wanted to change it to something a little bit creepier. Here is how to paint the Lady Annika Freehand Skull that replaced it! It includes tips on folds and how I did the weathering at the bottom of the cloth. Plus, I’ve also been working on her boots! Scroll to watch these tutorials with complete paints and materials used, and step-by-step tip Video: How to Paint the Lady Annika Freehand Skull All videos are recorded in HD 1080p or higher – use full screen for the full effect and let the video load completely. You can also click the little “cog” and change the speed of the video, if I am going too fast (or slow!). Materials Needed Primer: Black (if you started with a black primer base). Base Paints: Vallejo Black, German Grey, Neutral Grey, Dark Sea Grey. Highlight Paints: 50/50 mix of Neutral Grey and Dark Sea Grey. Weathering Paints: Vallejo Heavy Grey (appears green), Games Workshop Rhinox Hide, Cadian Fleshtone, Monfang Brown. Fine Detail Brushes Wet Palette Reference Image: A realistic skull from a science book (or the Internet!) for accuracy. Design Sketching: Sketch the skull design lightly on the skirt. Consider the folds and curves of the fabric; your design must follow these contours to look natural. The skull should be positioned considering the fabric’s folds, especially around tricky areas like deep creases or hard lines. Base Painting: Using Vallejo Black as your darkest shade, begin blocking in the skull and its surroundings. Gradually build up the mid-tones using German Grey and Neutral Grey. For highlights, use a 50/50 mix of Neutral Grey and Dark Sea Grey. Keep the contrast lower than other elements (like the boots) to ensure the skirt’s design doesn’t overpower the miniature’s other focal points. Adding Details: Focus on defining the skull’s features, adjusting for the fabric’s folds. Use your mixed greys to paint in the finer details, such as the teeth and eye sockets, considering the underlying fabric’s shape and the skull’s anatomy. For the headdress, spikes, and cobweb details, apply the same grey tones, ensuring they blend seamlessly into the skull. Final Highlights and Shadows: Revisit the highlights and shadows, emphasizing the skull’s curvature and the fabric’s texture. Use the lighter greys to enhance the design’s three-dimensionality, paying special attention to areas that catch the light or recede into shadow. Weathering: Start with Rhinox Hide, diluted significantly with water. Apply it to the lower third of the skirt, building up layers until you achieve a subtle, brown tint. Follow with Monfang Brown for a richer tone, focusing more intensely at the very bottom. This creates a gradient effect, simulating dirt accumulation. Final Touches: Use a mix of the weathering colours to add texture and depth to the weathered area, mimicking the appearance of mud or dust caught in the fabric’s texture. This step enhances the realism of your miniature, grounding it in its environment. Review and Adjust : Examine your work closely, making any necessary adjustments to the weathering to ensure a natural transition from the painted design to the simulated dirt. If needed, glaze over parts of the skull or weathering with thinned paint to adjust the contrast or saturation. Video: How to Paint Lady Annikas Boots Painting shiny leather boots requires patience and attention to detail. By carefully building up highlights, adjusting them as needed, and using techniques like stippling and glazing, you can achieve a realistic leather effect that stands out. The key to success is experimenting with light and shadow to create depth and texture that mimics real leather. Materials Needed to Paint Lady Annikas Boots: Vallejo Paints: Black, Neutral Grey P3 Paint: Morrow White (or any white paint) Wet palette Fine detail brushes (sizes 0 and 00 recommended) Kitchen roll or paper towel Lamp for highlighting guidance Preparation and Painting Process: Prepare Your Palette: On your wet palette, mix a variety of greys using Black from Vallejo, Neutral Grey from Vallejo, and P3 Morrow White. The goal is to create a spectrum of grey shades. You can adjust the quantities to get lighter or darker shades as needed. Base Coating: Start with a base coat of Neutral Grey on the boots. You can adjust the shade by mixing in either more black or white to darken or lighten the grey, respectively. This base coat serves as the foundation for building up highlights and shadows. Highlight Mapping: Using a slightly lighter grey, begin mapping out where the highlights on the boots will be. Don’t worry about being too precise; the goal is to identify where light naturally hits the boots. Use a lamp to observe how light interacts with the surface and mimic this on the model. Remember, we aim for a shiny leather look, so some highlights will be exaggerated. Adjusting Highlights: If you over-highlight, it’s fine. You’ll refine these highlights later in the process. The key is to create contrast and depth, making the boots appear shiny. Lady Annika’s slender design means space is limited, so choose your highlight areas wisely, focusing on making them visible from the primary viewing angle. Glazing and Fine Tuning: Once you’re satisfied with the highlight placement, it’s time to blend and smooth out the transitions. This is where the stippling technique comes into play. Dilute your paint with water (around a 50:50 ratio, but adjust as necessary for a finer stipple) and gently apply to the edges of highlights to create a gradual transition. Glaze over the boots with a thin layer of black to enrich the colour and add depth. This will also help to knock back any over-highlighted areas, ensuring they blend seamlessly into the overall finish. Reflective Highlights: For added realism, incorporate some reflective highlights. These should be small and placed strategically to mimic how light reflects off a shiny surface. Use the brightest grey or even white for these highlights but apply them sparingly. Final Adjustments: Review the model under different angles and lighting conditions. You might need to go back and adjust some highlights or shadows to ensure the boots look good from all perspectives. The goal is for the boots to have a high contrast, shiny appearance, indicative of leather. Finishing Touches: As a final step, use glazing to unify all the elements. A thin glaze of black can help to tie together the highlights and shadows, making the transition between them smoother and more natural. This step also adds a satin finish to the boots, enhancing the leather effect. For all the videos on how I painted Lady Annika, the Thirsting Blade, in one place, follow this link!: Lady Annika, The Thirsting Blade Golden Demon Entry – Lady Annika’s thirst for blood is legendary, even amongst the Soulblight vampires! I really enjoyed painting her and made a few tweaks to the model. Watch Now If you don’t have an account, please sign up here! The website currently has over 350 video tutorials with steps and tips, plus a selection of PDFs. If you are not sure about joining, you can explore my free videos with a free membership, or take the plunge and become a full subscriber for full access. If you’d prefer to support me on Patreon, please visit: https://www.patreon.com/RichardGray [...]
How to Paint Sigvald The Magnificent – Shield Freehand
Here is a close up of the freehand on the shield I painted for Sigvald the Magnificent! It was quite a fun piece, right up until adding the light at the end when it got a bit stressful! Read on for my tutorial videos on how I painted it, with step by step tips and full paints list. How to Paint: Shield and Freehand The following paints were used: Games Workshop: Daemonette Hide, Cadian Fleshtone, Vallejo: Black, Ice Yellow How to Paint: Shield and Freehand Part Two The following paints were used: Games Workshop: Daemonette Hide, Cadian Fleshtone, Mephiston Red Vallejo: Black, Ice Yellow, Pale Grey blue P3: Morrow White Top Tips: Shield and Freehand Wet Palette Preparation: Begin with a wet palette to keep your paints hydrated.Utilise a variety of colours, including Daemonette Hide, Daemonette Hide and Flesh Tone mix, Cadian Fleshtone, Cadian Fleshtone mixed with Ice Yellow, and Ice Yellow.Base Work and Background: Commence by roughly blocking in the main shapes for the shield freehand. Don’t worry about perfection at this stage.Use a flat black background to provide a canvas for your work.Freehand Technique: When painting freehand, it’s recommended to start with a messy application, focusing on getting the shapes in the right place.Consider the androgynous nature of the face and add subtle demonic elements.Work on defining features like cheekbones, eyes, and forehead gradually.Lighting Considerations: Plan for top-left lighting and be mindful of how it interacts with the background and the freehand.Avoid pre-painting the background shine to maintain consistency when adding lighting later.Refinement Process: Refine the face by adjusting shapes and proportions as you progress.Pay attention to the texture and subtleties in the paintwork, allowing for variations and imperfections.Use reference images of faces and lighting to enhance realism.Layering and Thinning Paint: Thin your paints to ensure smooth layering, especially as you’ll be applying multiple layers.Experiment with thinning ratios, but generally, aim for about one and a half to two times water to one part paint.Brush Techniques: Utilise different brushes for specific tasks. A newer brush for softer marks and an older one for larger, softer applications.Pay attention to the size of the brush tip for finer details.Adding Subtle Details: Introduce subtle details by lifting the brush to create dots where the paint is thinner, adding character to the piece.Experiment with depositing tiny dots of paint to create texture and shadows.Shading and Shadow Definition: Use darker colours like Daemonette Hide mixed with black for shadow definition.Consider the natural shadowing on curved surfaces, like the bottom of the chin.Final Touches and Tweaks: Continuously refine and tweak elements while the paint is still wet.Use excess paint dots to your advantage by pushing them around to achieve desired effects. Have you got a Sigvald to paint? Follow my full Sigvald the Magnificent painting guide: How to Paint Sigvald the Magnificent with NMM All of the tutorials for Sigvald the Magnificent, including how to paint NMM (gold) armour, face and horns, freehand shield, NMM silver sword and hilt and more! Watch Now If you don’t have an account, please sign up here! The website currently has over 350 video tutorials with steps and tips, plus a selection of PDFs. If you are not sure about joining, you can explore my free videos with a free membership, or take the plunge and become a full subscriber for full access. If you’d prefer to support me on Patreon, please visit: https://www.patreon.com/RichardGray [...]
How to Paint Freehand on Imperial Fists Redemptor Dreadnought
Learn how to paint freehand on a Imperial Fists Redemptor Dreadnought, with a fist design and a guide on neat, freehand text in a ribbon. These videos come with paints and a step-by-step guide. Scroll down to get started or click the below to quick jump to a specific technique. Quick Jump: Video: Imperial Fist Freehand SymbolPaints and MaterialsHow to Paint Freehand on Imperial Fists – Step-by-Step GuideVideo: Imperial Fist Freehand TextPaints and MaterialsHow to Paint Freehand on Imperial Fists – Step-by-Step GuideExplore more Freehand Tutorials! Video: Imperial Fist Freehand Symbol Paints and Materials Vallejo: German Grey, Neutral Grey, Pale Blue Grey, Black P3: Morrow White Games Workshop: Balor Brown, Naggaroth Night Fine detail brush How to Paint Freehand on Imperial Fists – Step-by-Step Guide Prepare the Surface: Begin with a clean, primed chest plate of the Redemptor Dreadnought. Outline the Fist: Start with Vallejo Model Colour Black. Sketch a rough outline of the fist. At this stage, focus on general placement rather than detail. Ensure the fist is centralised to avoid asymmetry. Blocking in Basic Shapes: Using Neutral Grey, block in the shapes of the fingers and thumb. Keep the shapes simple. Use the grey to sketch out the basic anatomy of the fist, ignoring finer details for now. Adding Depth with Grey Shades: Use a mix of Neutral Grey, German Grey, and Pale Blue Grey for varying shades. Gradually define the fingers and palm, focusing on the curvature and how light would naturally hit these surfaces. Remember, fingers are cylindrical, not flat. Detailing with Lighter Colours: Progressively lighten the greys as you add more detail. The aim is to create a sense of depth and three-dimensionality in the fist. Highlighting: Use P3 Morrow White for the highest highlights. Focus these highlights where the light would be strongest, creating a shiny, metallic effect. Balance is key; too much white can reduce the shiny appearance. Refining and Correcting: Go back with Vallejo Model Colour Black to refine and correct the shape. Use black to sharpen edges and deepen shadows, enhancing the three-dimensional look. Weathering and Final Touches: For weathering, apply Balor Brown to create chips and scratches, blending them into the overall design. Use Naggaroth Night to glaze and add a subtle contrast to the yellow armour. Finish by ensuring the highlights and shadows are well balanced and the symbol integrates seamlessly with the rest of the model. Tips: Use your own hand as a reference for the fist, but remember, the Space Marine gauntlet will differ in shape. Ensure your brush is finely pointed for the intricate details. Keep your hand steady. Resting your painting hand on a stable surface can help. Work in good lighting to accurately see the effects of your shading and highlighting. Video: Imperial Fist Freehand Text Paints and Materials Games Workshop: Baneblade Brown, Rhinox Hide, Morghast Bone, Screaming Skull, Balor Brown Vallejo: Model Colour Black Fine detail brush Well palette How to Paint Freehand on Imperial Fists – Step-by-Step Guide Outline the Ribbon: Start by sketching the basic shape of the banner with Morghast Bone. Use a smaller brush for detailed edges and a larger brush for the main section to achieve a smoother finish. Detailing the Ribbon: Paint the stringy ends of the ribbon with Morghast Bone. For shadowing, mix Baneblade Brown and Rhinox Hide (about 50/50). Apply the shadow mix along the edges and folds of the ribbon to create depth. Remember, the colour dries lighter, so adjust accordingly. Refining and Shading: For the curled sections, ensure they are darker than the main ribbon for a three-dimensional effect. Use a thin brush for smooth edges and avoid bumps. If necessary, go over the edges to sharpen them with Morghast Bone. Weathering the Ribbon: Apply Balor Brown for weathering and chipping effects. Focus on creating an aged and worn look but avoid overdoing it. Final Touches: Add highlights using Screaming Skull to the main parts of the ribbon for contrast. Blend carefully to achieve a natural look. Steps for Painting the Text: Initial Lettering: Use Vallejo Model Colour Black for the text. Start by typing simple letters for spacing. Use the first and last letters as anchors, and ensure even spacing in between. Refining the Font: Once the basic lettering is done, refine the font. Make corrections and enhance the letters using Screaming Skull. Aim for sharp, clear lettering. Finalising the Text: Once you have the letters shaped, thicken and define them for legibility. Keep the line weight consistent throughout for a uniform look. Use Morghast Bone or Screaming Skull to make corrections and sharpen the edges. Weathering the Text: If desired, weather the text lightly with Balor Brown. Be cautious not to distort the letters too much. Applying a Filter: For a worn effect, apply a heavily watered-down glaze of Mournfang Brown and Yriel Yellow over the entire freehand area. This softens the colours and blends the text with the banner. Tips: Use a well-supported posture for steady hand movements. Ensure your brushes are in good condition. A sharper brush is essential for fine details. Be patient and allow layers to dry before applying more paint. Consistency in your brushwork is key to achieving a professional look. Explore more Freehand Tutorials! If you don’t have an account, please sign up here! The website currently has over 350 video tutorials with steps and tips, plus a selection of PDFs. If you are not sure about joining, you can explore my free videos with a free membership, or take the plunge and become a full subscriber for full access. If you’d prefer to support me on Patreon, please visit: https://www.patreon.com/RichardGray [...]
How to Freehand Paint a Skull
A tutorial on how to freehand paint a skull onto a clear surface, in this case the shoulder of a Titan. All videos are recorded in HD 1080p or higher – use full screen for the full effect and let the video load completely. Materials Required Your miniature for the freehand to be painted on! Mine is a Warlord Titan, Brushes (various sizes, including a size 0 for fine details) Vallejo Model Color Black Games Workshop paints: Rhinox Hide, Ceramite White, Balor Brown, Ushabti Bone, Mephiston Red, Wild Rider Red Vallejo paints: Pale Grey Blue, Dark Sea Grey Step 1: Preparing the Area Begin with a flat area on your model. Make sure it is clean and free of any mould lines, dirt or grease. Apply a black primer base, then airbrush layers of grey, a glaze of purple, and grey again to create a dynamic background. Step 2: Sketching the Freehand Design Start by blocking in the rough shape of a skull in the centre. Use Vallejo Model Color Black for strong coverage and a matte finish. Ensure the initial shape is smaller so you can adjust the size as needed without difficulty. Step 3: Adding Details as You Freehand Paint a Skull Add the eye sockets and nose hole, focusing on making the skull slightly asymmetrical to add interest. Use Rhinox Hide to block in shadows and define the shape of the skull, especially around the cheekbones and beneath the eye sockets. Step 4: Refining the Skull Gradually build up the skull’s details using a mix of Balor Brown and Ushabti Bone. This process involves adding highlights and shadows to create depth and texture. Pay attention to the top-down lighting, ensuring the highlights and shadows correspond to this light source. Step 5: Painting the Blindfold and Chains Paint the blindfold using Mephiston Red, ensuring it wraps realistically around the contours of the skull. For the chains, start with Vallejo Model Color Black to outline the shapes, then use Pale Grey Blue and Dark Sea Grey to add highlights and shadows, creating a metallic look. Step 6: Finishing Touches Use Ceramite White for the highest highlights, focusing on areas like the forehead and teeth to enhance the skull’s dimensional effect. Apply small amounts of shading and texture throughout the skull to refine its appearance. Step 7: Adding Atmospheric Effects To give the skull a darker, moodier feel, consider using a water mixable oil color like burnt umber around the edges and in the recesses. This step is optional but can add a significant impact to the final look. Remember, the key to successful miniature painting, especially when dealing with freehand designs, lies in patience, practice, and attention to detail. More Freehand Tutorials If you don’t have an account, please sign up here! The website currently has over 350 video tutorials with steps and tips, plus a selection of PDFs. If you are not sure about joining, you can explore my free videos with a free membership, or take the plunge and become a full subscriber for full access. If you’d prefer to support me on Patreon, please visit: https://www.patreon.com/RichardGray [...]
How to Paint Weathered Armour Plate and Freehand Text
Two videos on how to paint weathered armour plate, complete with rust, scratches and chips and a simple freehand banner. You won’t need an airbrush for this tutorial. Video: Part One – Armour and Weathering Materials and Paints Needed Games Workshop Paints: Balor Brown, Yriel Yellow, Mournfang Brown, Rhinox Hide Vallejo Paints: Neutral Grey, Pale Grey Blue, White Brushes: Large dry brush (or makeup brush), fine detail brush, glazing brush (size 4 or similar) Accessories: Water for thinning paints, kitchen towel for wiping brushes, well palette Preparing the Model Clean and prime your Redemptor Dreadnought model. A light grey or white primer is recommended for bright colours like yellow. Base Coating with Stippling Technique Mix Balor Brown with water in a roughly 50/50 ratio. This will be your base layer. Stipple Balor Brown onto the armour panels using a large, round, flat brush. Aim for gentle touches to build up the texture without creating pronounced, three-dimensional brush marks. Allow the paint to dry fully before adding more layers. This creates a worn, battlefield-ready appearance. Glazing for Colour Depth Create glazes in your well palette by mixing Mournfang Brown and Yriel Yellow separately with water, using about 6-7 parts water to 1 part paint. Apply Mournfang Brown glaze to shade areas, starting from lighter areas and moving the brush towards darker regions. This adds warmth to the shadows. Apply Yriel Yellow glaze over the entire panel, focusing more paint towards the centre for a vibrant effect. Ensure to remove excess paint from your brush to avoid pooling. Chipping for Weathered Effect Use Rhinox Hide with a fine detail brush to create chipping along the edges of the armour panels where wear would naturally occur. Remember, less is more; avoid overdoing it with lines and crosses. Highlight the lower edge of each chip with Yriel Yellow to simulate the armour’s wear and tear, making the chips stand out more against the base layers. Detailing and Finishing Touches Rivets: Paint each rivet with a dot of Pale Grey Blue on the top left and a tiny line on the bottom right to simulate light reflection. Metal Exposure: Use Neutral Grey to paint areas where the metal beneath the yellow paint would show through, particularly around chips and edges. This technique helps redefine the model’s shape and adds dimensionality to the weathering. Final Highlights: Add a final touch by placing a small dot of White on the most prominent parts of the chips and rivets to enhance the reflective effect. Video: Part Two – Freehand Banner Materials and Paints Needed: Games Workshop Paints: Baneblade Brown, Rhinox Hide, Morghast Bone, Screaming Skull, Balor Brown Vallejo Paints: Model Colour Black Brushes: A smaller brush for initial sketching and detailing, and a larger brush for smoother finishes on larger sections. Other Supplies: Water for thinning paints, a palette for mixing, and kitchen towel for wiping off excess paint. Preparing the Banner: Base Layer with Morghast Bone: Begin by sketching the basic shape of the banner on the shoulder pad using Morghast Bone. This step involves creating the outline and filling in the banner. For larger sections, use a larger brush to achieve a smoother finish. Refining Edges: Use a smaller brush to refine the edges and the trailing ends of the banner. Aim for a shape that complements the space available on the shoulder pad, keeping in mind the overall design and avoiding overly stubby ends. Applying Shadow with Baneblade Brown and Rhinox Hide Mix: Mix approximately 50/50 Baneblade Brown and Rhinox Hide to create a shadow colour. Apply this mixture to add depth and shadow to the banner, especially along the edges and the banner’s folds. Highlight with Screaming Skull: To highlight the main body of the banner and give it a three-dimensional appearance, apply Screaming Skull, focusing on the central and raised areas. This step brings out the details and makes the banner stand out. Painting the Text: Sketching Text with Vallejo Model Colour Black: Using a fine detail brush and Vallejo Model Colour Black, begin sketching the text onto the banner. Start with basic shapes for letters and focus on spacing. The chosen word for this tutorial is “MORTIS.” Refining Letters: Once the basic spacing and shape are down, refine each letter for clarity and style. Adjust the thickness of the lines and add any stylistic flourishes to match the desired font. Consistency in line weight and style across all letters is crucial for readability. Correcting and Sharpening Edges: Use Morghast Bone and Screaming Skull to correct any overshoots or to sharpen the edges of the letters. This step allows for cleaner lines and more precise letter shapes. Final Touches: Weathering: To integrate the text and banner naturally with the rest of the model, apply weathering. Use Balor Brown to simulate chipped paint and wear on the banner and text. This step adds realism and character to the model. Applying Filters: A filter of heavily diluted Mournfang Brown and Yriel Yellow can be applied over the entire freehand work. This unifies the colours, softens the contrast, and gives the banner and text a worn look, blending them seamlessly with the model’s overall weathered appearance. More Free Video Tutorials More Free videos are available for for logged in members – just sign up as a ‘friend’ to view and click any of the thumbs.To explore all of these, visit this page! If you don’t have an account, please sign up here! The website currently has over 350 video tutorials, plus step by step guides and PDFs. You can explore more free videos with a free membership, or take the plunge and become a full subscriber for full access. If you’d prefer to support me on Patreon, please visit: https://www.patreon.com/RichardGray [...]
Freehand Skull on Castellan Knight
A video tutorial with step-by-step guide on how to freehand a skull on Castellan Knight legplate, with advanced shading and patterns. This guide will take you through painting a detailed skull freehand on the shin panel of a Castellan Knight miniature from Games Workshop. We’re focusing on creating a striking skull design amidst a vivid background, with a two-part process that lays the groundwork for intricate background details to be added later. The process begins with modifying the shin panel for a smooth painting surface, followed by base colouring, sketching, and detailing the skull. Video: Freehand Skull on Imperial Knight Part One Materials Needed Brushes: Size 1 Artist Opus Brush (used throughout the video for detailed work) Paints: Games Workshop (Citadel): Rhinox Hide: Base sketching of the skull Balor Brown: Refining skull details Ushabti Bone: Highlighting the skull Ceramite White: Final highlights on the skull Wild Rider Red: Used for airbrushing the background (mentioned as part of the orange base) Troll Slayer Orange: Part of the airbrushed background Mournfang Brown: Used in shadows and for airbrushing background details Privateer Press (P3): Battlefield Brown: Alternative to GW Scorched Brown, used for shading Vallejo: Model Colour Black: For defining eye sockets and other dark areas on the skull Other Materials: Airbrush: For applying the base layer of the shin panel Scalpel: For modifying the shin panel to create a smooth surface Fine Grit Sandpaper: For smoothing the modified shin area Wet Palette: To keep paints hydrated and workable Water Container: For rinsing brushes Paper Towels: For brush cleaning and paint dabbing Preparation Tools: Filling Material: To fill in gaps after modifying the shin panel for a smooth painting surface Step-by-Step Guide Preparing the Surface Modify the Shin Panel: Begin by carefully removing excess detail from the shin panel using a scalpel. Fill in any gaps to create a smooth surface for your freehand painting. Although minor dimples might remain, they will be covered by the paintwork. Base Colouring Airbrush Background: Apply an airbrushed base layer using Wildrider Orange, Troll Slayer Orange, and a touch of Mournfang Brown for shadows. This creates a vibrant orange backdrop, setting a stark contrast for the skull. Sketching the Skull Outline with Rhinox Hide: Start sketching the skull using Rhinox Hide, focusing on getting the overall shape rather than detailed features like eye sockets or teeth. This stage doesn’t require perfection in symmetry or detail, as adjustments can be made later. Refine with Balor Brown: With Balor Brown, begin refining the skull’s structure, particularly around the temples, nose, and eye sockets. This layer adds dimension and prepares for detailed work. Detailing the Skull Highlight with Ushabti Bone: Use Ushabti Bone to start bringing out the highlights of the skull. This step involves building up from the darkest shadows to the lightest areas, considering the light source will be from the top left. Deepen Shadows: Apply Vallejo Model Colour Black to define the eye sockets and other deep shadows within the skull, enhancing the contrast and depth. Add Texture and Fine Details: Continue with Balor Brown and Ushabti Bone, applying very light, fine strokes to create texture and detail across the skull’s surface. Focus on asymmetry and imperfections for a more realistic appearance. Final Highlights with Ceramite White: Use Ceramite White sparingly to add the brightest highlights, concentrating on areas that would catch the most light. This step dramatically increases the contrast and brings the skull to life. Starting the Background Pattern Outline Pattern with Black: Begin outlining the background pattern, starting with simple geometric shapes and lines to create a non-symmetrical, maze-like design. This base pattern sets the stage for further detailing. Apply Initial Highlights: Initially, experiment with Fire Dragon Bright for highlights but plan to integrate the skull’s colours (Balor Brown, Ushabti Bone, Ceramite White) into the background for consistency. Finishing Touches Adjust and Refine: As the background pattern develops, continuously adjust and refine the design. Incorporate shadows and highlights to create depth and interest, using P3 Battlefield Brown for shading. Merge Skull and Background: Begin to subtly blend elements of the skull into the background pattern, ensuring the entire piece feels cohesive. Video: Freehand Skull on Imperial Knight Part Two Where we focus on refining the maze-like background detail introduced in Part 1, enhancing the overall visual appeal and integrating the skull into the pattern for a cohesive look. Materials Required: Brushes: A fine detail brush, ideally size 0 or 1. Paints: Games Workshop’s Wild Rider Red, Rhinox Hide, Ceramite White, Zamersi Desert, Ushabti Bone, Firedragon Bright, Abaddon Black, and P3’s Battlefield Brown (or Baneblade Brown as a GW alternative). Other Supplies: A wet palette for mixing paints, water for thinning paints, and kitchen paper for brush cleaning. Step-by-Step Guide: Review and Refine the Existing Pattern: Begin by assessing the pattern laid out in Part 1. Identify areas that require refining or adjustments to ensure a unified appearance across the entire shin armour. Adjusting the Pattern: Use a mix of Rhinox Hide and Battlefield Brown to refine areas needing adjustments. This may involve smoothing transitions between different sections of the pattern or altering shapes to better integrate with the overall design. Focus particularly on areas around the white dots and sections that appeared overly bright or disjointed in Part 1. The aim is to create seamless transitions between the skull and the background pattern. Enhancing Contrast and Depth: Apply thin glazes of Rhinox Hide in areas needing more depth, helping to highlight details and make the pattern more intricate. Increase contrast by selectively brightening areas with Zamersi Desert, followed by Ushabti Bone and Ceramite White for the highest highlights. This step is crucial for giving the pattern a three-dimensional look. Blending the Skull into the Pattern: To integrate the skull into the background, extend pattern elements over the edges of the skull. Use a fine detail brush and steady hand to draw lines and shapes that flow from the skull into the surrounding areas, unifying them. Final Highlights and Touch-Ups: Add final highlights with Ceramite White to the highest points of the pattern, enhancing the illusion of depth and detail. Review the piece for any areas requiring further refinement or additional highlights before sealing your work. Glazing for Cohesion: Create a glaze with Firedragon Bright and water for a thin consistency. Apply this over the entire pattern, especially where transitions need softening or colours unifying. The glaze will blend highlights and shadows for a cohesive look. Finishing Touches: Once the glaze has dried, reassess the effect. If necessary, redefine any details with base colours that may have been softened too much by the glazing. Sealing the Work: After ensuring the paint is completely dry, apply a matte varnish to protect your work. This also helps unify the finish across different textures and layers. More Free Video Tutorials More free videos for logged in members – just sign up as a ‘friend’ to view and click any of the thumbs.To explore all of these, visit this page! If you don’t have an account, please sign up here! The website currently has over 350 video tutorials, plus step by step guides and PDFs. You can explore more free videos with a free “freebies” membership, or take the plunge and become a full subscriber for full access. If you’d prefer to support me on Patreon, please visit: https://www.patreon.com/RichardGray [...]
Video Tutorials : Abaddon Cloak
A series of videos showing how to paint the leathery effect and freehand on Abaddons Cloak. Part One – Leather… Please login to view this content at https://richardgraycreations.com/login/ [...]
How to Paint Master Lazarus’ Cloak
A selection of tutorials on how to paint Master Lazarus’ Cloak. In these we explore simple freehand with bold, clean lines, then move onto the more complex custom Dark Angel symbol on the rear of Master Lazarus of the Dark Angels. Video: Simple Freehand Cloak – Front This video shows how to paint the simple Dark Angel freehand symbol on the inside of the cloak of Master Lazarus The following paints were used: Games Workshop: Mephiston Red Vallejo: Ice Yellow, Neutral Grey, Pale Grey Blue Step-by-Step – How to paint the cloak of Master Lazarus of the Dark Angels Step 1: Preparation Ensure that you have already glued the cloak onto the model.Have Mephiston Red paint ready for the freehand work.Make sure you’ve applied texture work to the cloak before starting the freehand.Step 2: Starting the FreehandBegin with a drag motion using Mephiston Red along the edge of the cloak. This will be your first guideline.Maintain consistent pressure while painting to ensure an even line.Step 3: Lower EdgeRepeat the process for the lower edge.Step 4: Creating Simple ShapesPaint a line equidistant from horizontal and vertical lines, forming the basis for the sword part of the wing.Be cautious with thickness and avoid making it too thick.Step 5: Painting WingsPaint the wings by going straight up towards the guideline, making your life easier.Focus on leaving space at the top for the hilt of the sword.Feel free to paint curves for feathers, keeping in mind the hilt’s space.Step 6: Painting the HiltPaint a line straight across for the hilt, extending it to touch the wings.Use neutral gray and pale gray blue to define the diamond shapes on the hilt.Cut into the edges with the appropriate gray colours to make it sharp.Step 7: Adding Details to FeathersUse neutral gray and pale gray blue to define individual feathers on the wing.Make them as sharp as possible, and don’t worry if they look slightly patchy.Step 8: Adding Lighting EffectsMix ice yellow with the base colour to create a gradient for the highlights.Paint a gradient up towards the lightest part on the cloak, following the natural flow of light.Ensure neat painting, using the tip of the brush and bracing your arms for stability.Step 9: Final TouchOptionally, add a touch of ice yellow to the line underneath the hand for a subtle transition.Soften the contrast and make the lighting more cohesive with the overall model. Video: Complex Cloak – Back Freehand Part One This video shows the difficulty of painting a design for the cloak of Master Lazarus and how to paint the freehand. The following paints were used: Vallejo: Black, Pale Grey Blue, Dark Blue Pale, Dark Grey, Black P3: Morrow White Step-by-Step – How to paint the cloak of Master Lazarus of the Dark Angels Step 1: Prepare the BaseMake sure your model has been previously stippled and glazed, creating a smooth surface for the freehand work.If needed, adjust the base colours by adding white and gray-blue to achieve a smoother finish.Step 2: Outline the DesignBegin by using Vallejo model colour black to outline the freehand design on the rear of Master Lazarus’s cloak.Take note of any folds or challenges in the cloak’s sculpt, as these may impact the symmetry and centralization of the design.Step 3: Adjust PlacementAddress any issues with the cloak’s fold or bias to one side by adjusting the placement of the design.Consider the visibility of the main focal points, such as a sword, and ensure they are not hidden within creases.Step 4: Start the Freehand WorkUse black as a base colour for the freehand work, focusing on creating the overall shapes and outlines of the design.The black background allows for easier corrections, but the details should be lighter than black to ensure visibility.Step 5: Refine the DesignRefine the shapes and details by using a 50/50 mix of dark blue pale and dark gray.Take your time with the refining stage, using the tip of the brush to add intricate details to feathers and other elements.Step 6: Add Organic DetailsIntroduce organic details, such as veins in the feathers, to make the freehand design look more natural.Make small tweaks to enhance the overall appearance, ensuring the design is visually appealing.Step 7: Focus on Feather HighlightsHighlight the feathers using a 50/50 mix of dark blue pale and dark gray, focusing on the tips and edges.Avoid making the edge highlights too obvious, maintaining the illusion of feathers.Step 8: Work on Sword HiltMove on to the detailed and complex freehand on the hilt of the sword, planning for a non-metallic effect.Use various shades, starting with dark blue pale and gradually adding pale gray blue for highlights.Step 9: Create Texture and HighlightsBuild texture by creating small marks and bumps on the hilt, paying attention to the shapes and transitions.Add dots with white on the brightest parts to enhance contrast and create a more dynamic effect.Step 10: Final TouchesMake final adjustments as needed, ensuring that the freehand complements the overall model without overshadowing it.Take breaks when necessary to maintain focus and avoid painting when fatigued.Note: Keep an eye on the wet palette, especially in warmer conditions, to prevent paint from thickening and affecting the painting process. Video: Complex Cloak – Back Freehand Part Two This video is part 2 for how to paint the custom Dark Angel symbol on the rear of Master Lazarus of the Dark Angels. The following paints were used: Vallejo: Dark Grey, Blue Grey Pale, Pale Grey Blue, Heavy Goldbrown, Ice Yellow, English Uniform, Black Games Workshop: Mournfang Brown P3: Morrow White Step-by-Step – How to paint freehand on Master Lazarus of the Dark Angels Step 1: PreparationEnsure you have the necessary paints ready: Dark Grey, Blue Grey Pale, Pale Grey Blue, Heavy Goldbrown, Nuln Oil, Pale Grey Blue, P3 Morrow White, and a 50/50 mix of Heavy Gold Brown and Ice Yellow.Step 3: Start with Skull and CircleUse English Uniform to roughly block in the skull and circle in the center of the cloak.Use Nuln Oil to define eye sockets and nose hole.Cut into shapes with black paint to refine details.Step 4: Gold Non-Metallic SkullHighlight skull with a mix of Heavy Goldbrown and Ice Yellow.Emphasize high contrast, especially on the forehead for a non-metallic look.Step 5: Detailing the BladePaint the blade using Blue, Blue Grey Pale, a 50/50 mix of Dark Gray and Pale Blue, and Pale Gray Blue.Consider the highlights on the blade separately to ensure clarity.Step 6: Refining the DesignCut back into the design with fluid black paint for sharper edges and finer highlights.Emphasize the central section of the blade, adjusting highlights accordingly.Add random highlights with Blue Grey Pale to enhance the non-metallic look.Step 7: Wings and TrimPaint the second wing with slight variations, maintaining an organic feel.Cut into black edges for sharpness, especially at the bottom of the cloak.Highlight the gold trim, aligning it with the natural highlights on the cloak.Step 8: Final TouchesCheck for any faults or blobs and address them.Avoid making highlights too bright, maintaining a realistic feel.Consider adding small details for visual interest without overshadowing the main design. All videos are recorded in HD 1080p or higher – use full screen for the full effect and let the video load completely. More Freehand tips: Videos Not Showing? To view any of my paid tutorials, you need to be a member of the website – please click below to log in or join the site. Not sure about joining just yet? Check out my Youtube for all my free tutorials or sign up as a free “friend” member on this site and visit the Freebies video page! If you’d prefer to support me on Patreon, please visit: https://www.patreon.com/RichardGray [...]
Video Tutorials : How to Paint Mortarions Wings
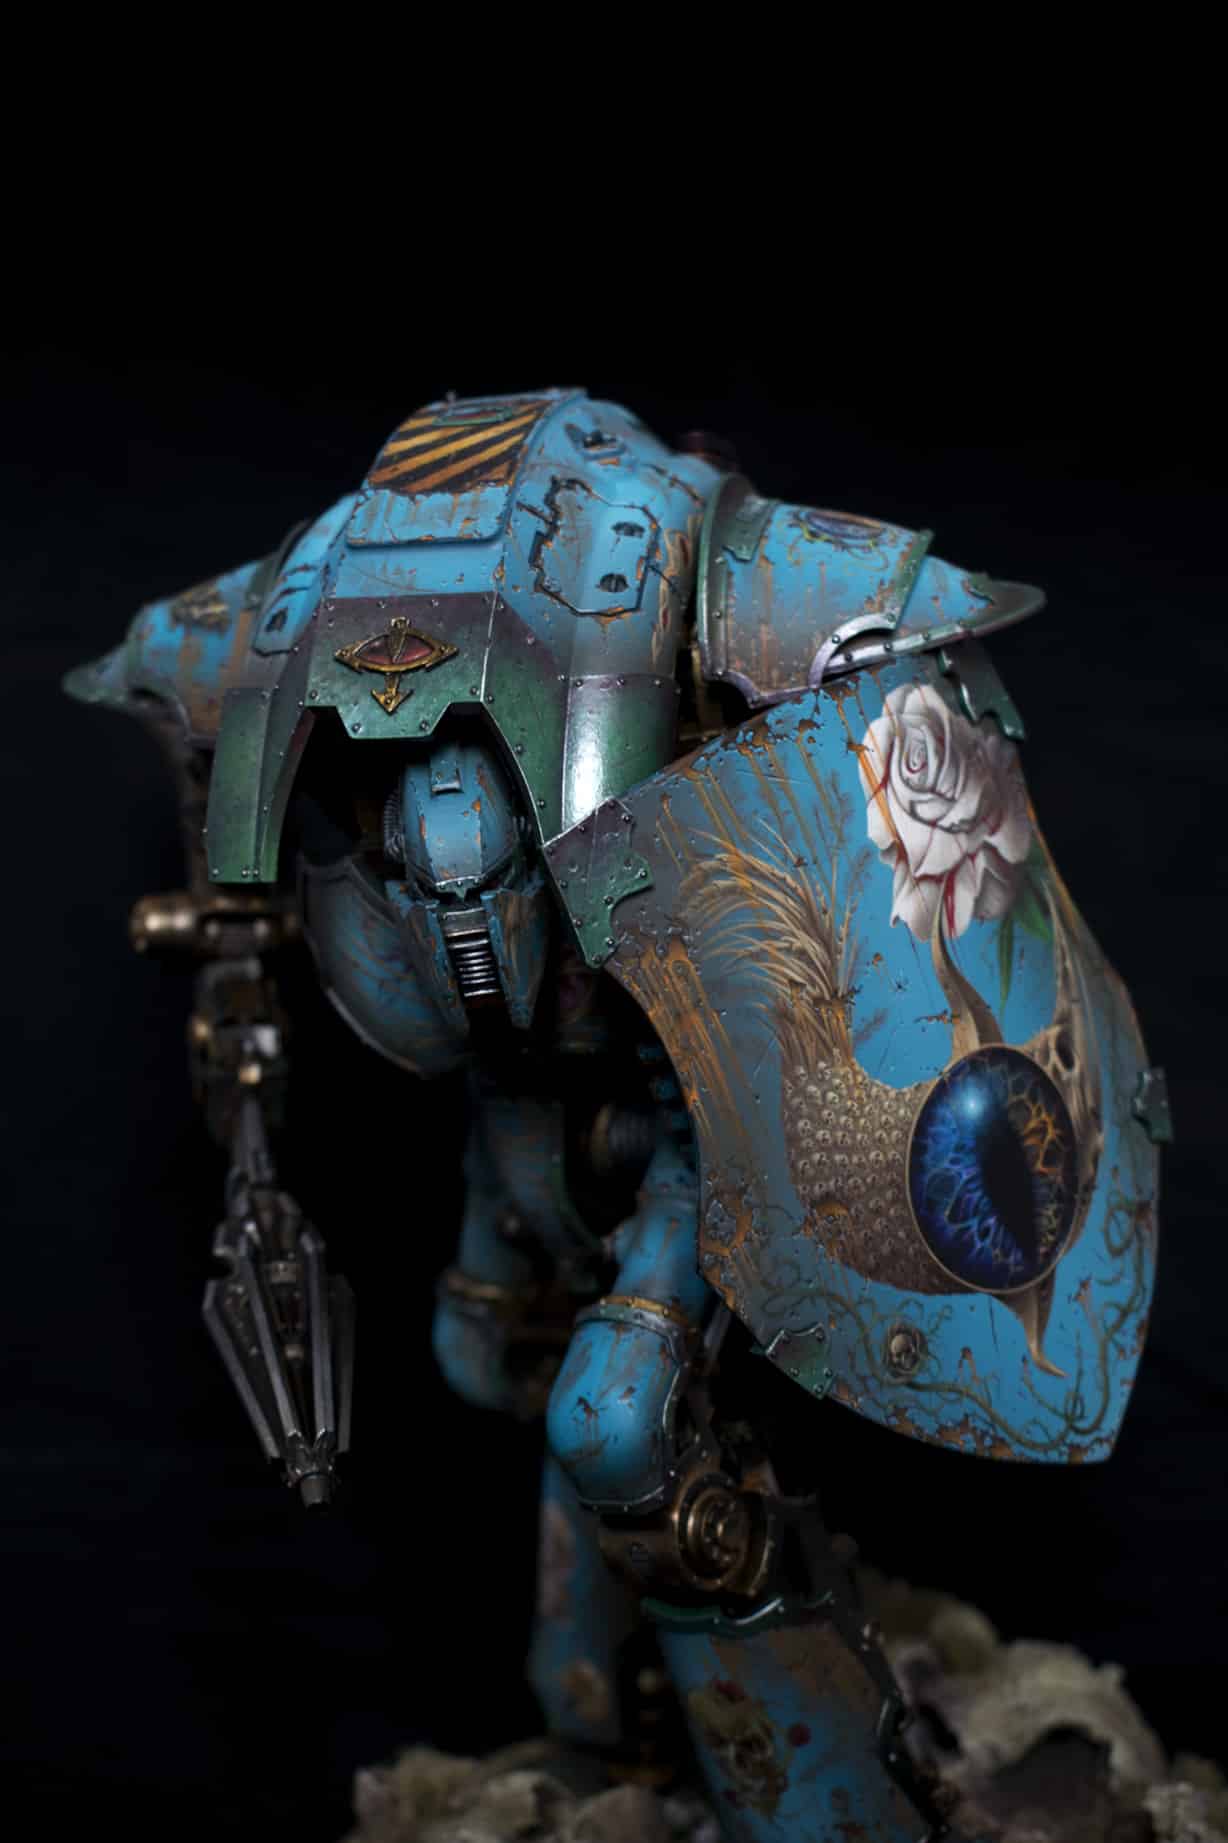
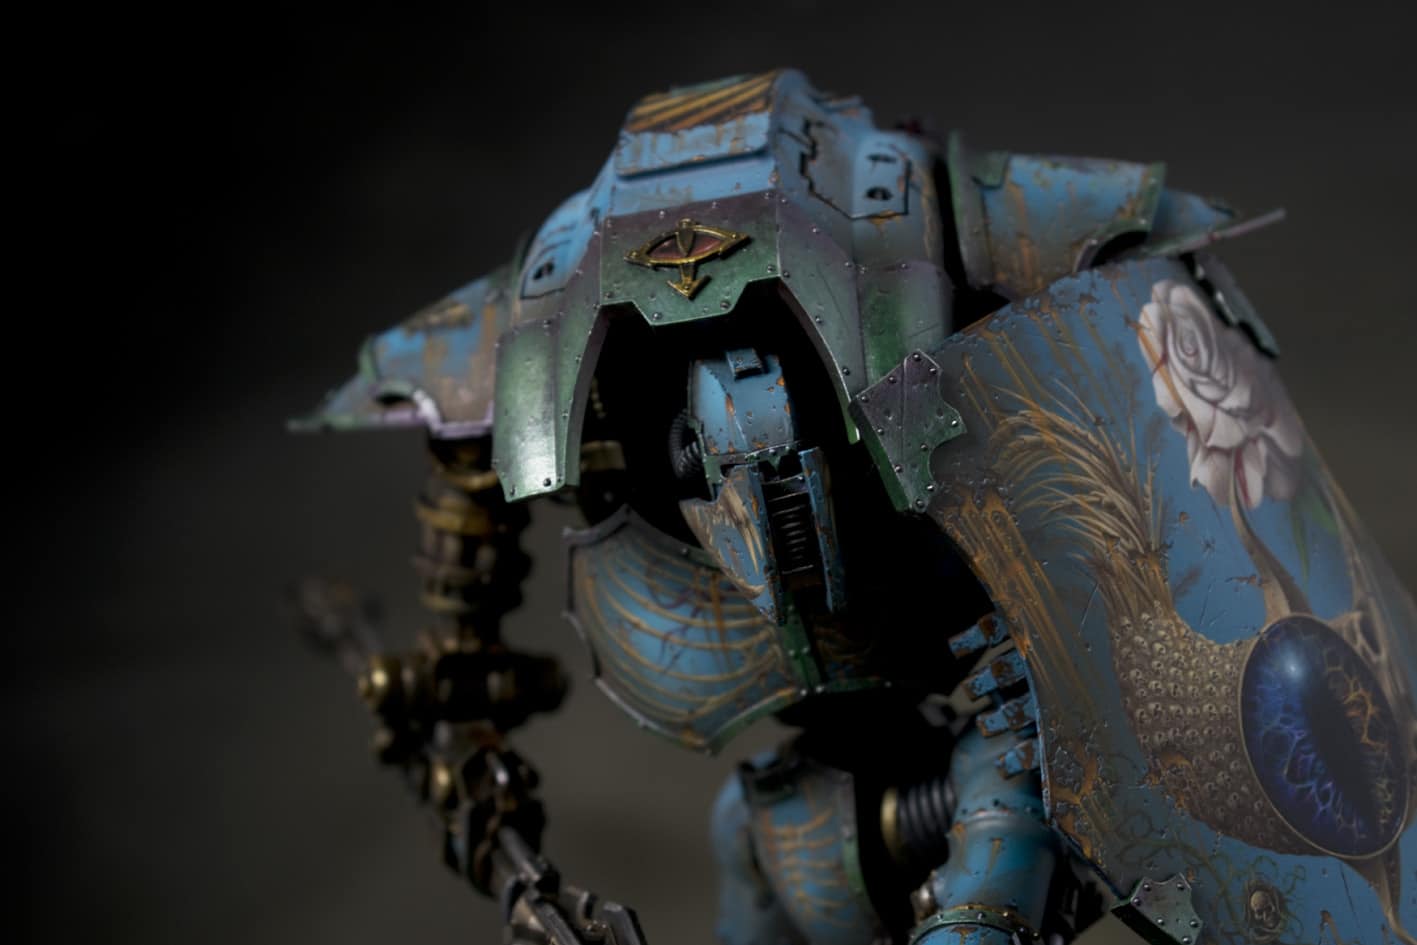
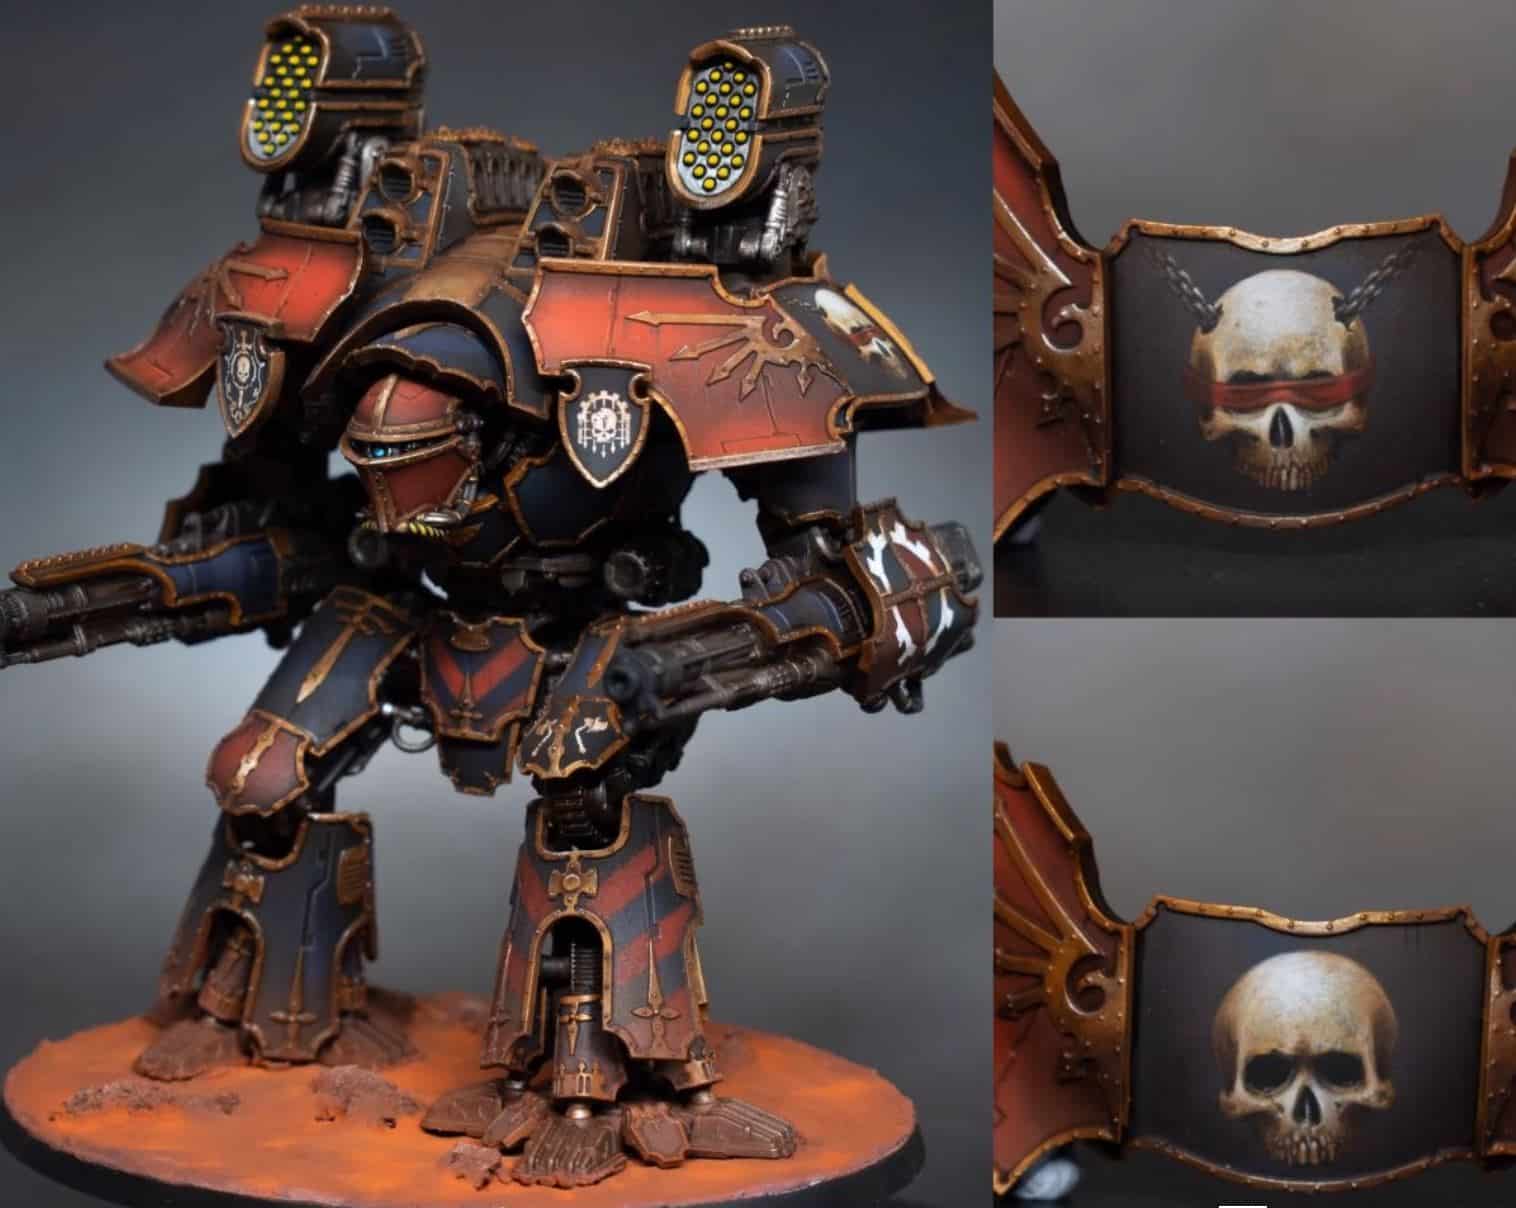
A set of video tutorials on How to Paint Mortarions Wings, with paints and step-by-step guides on freehand.
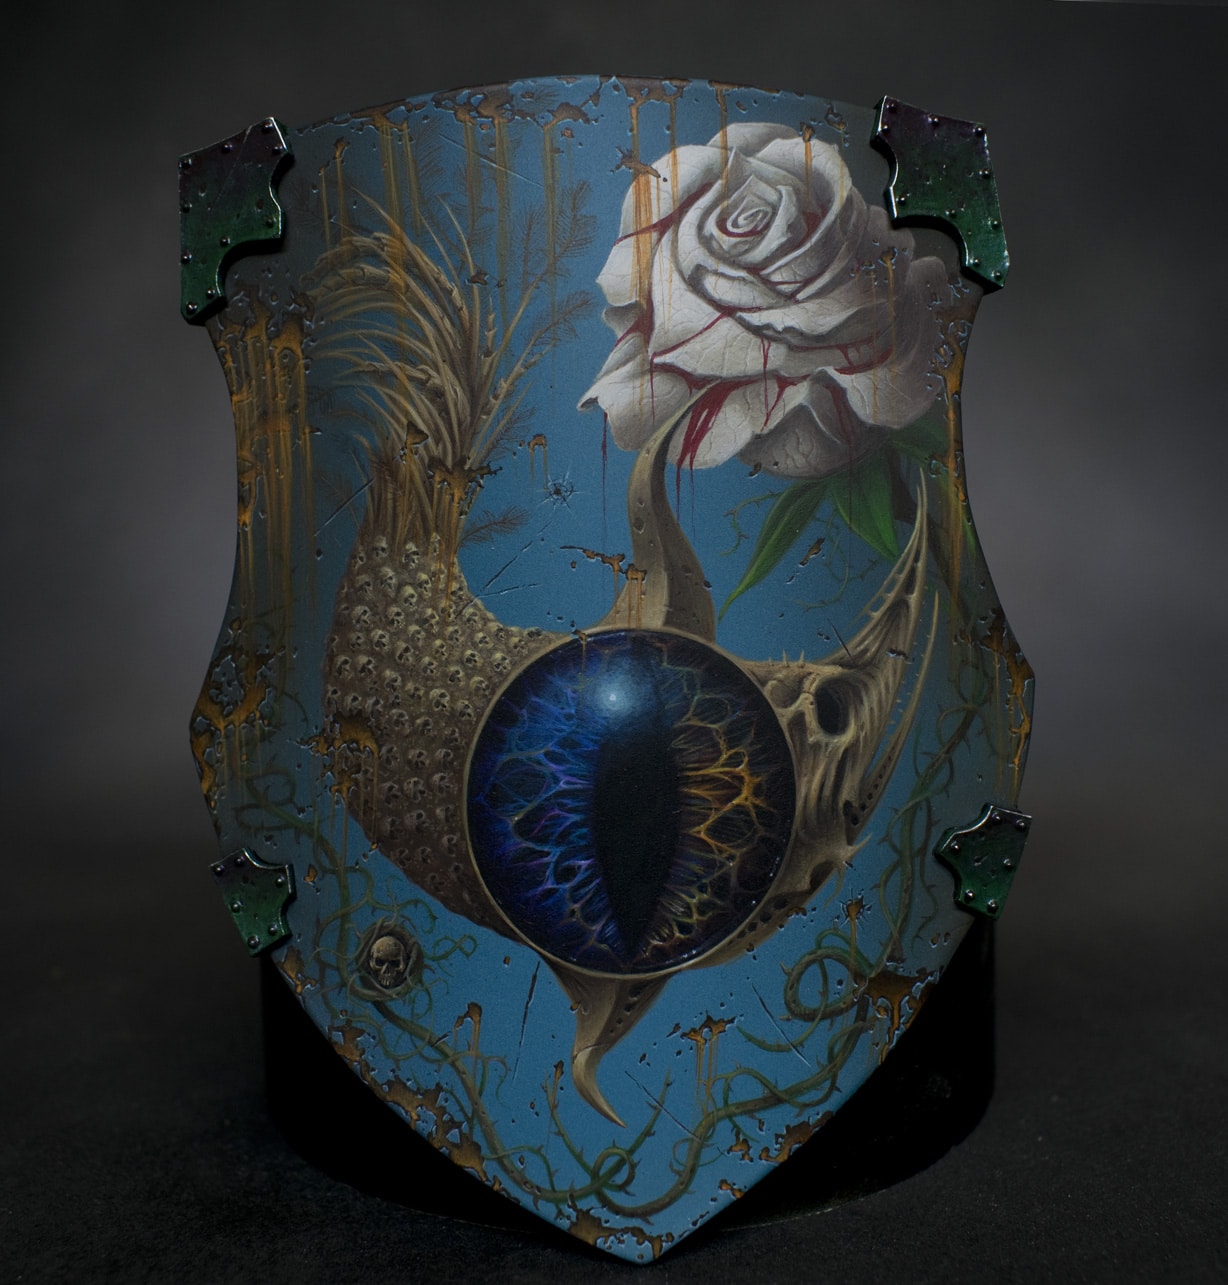
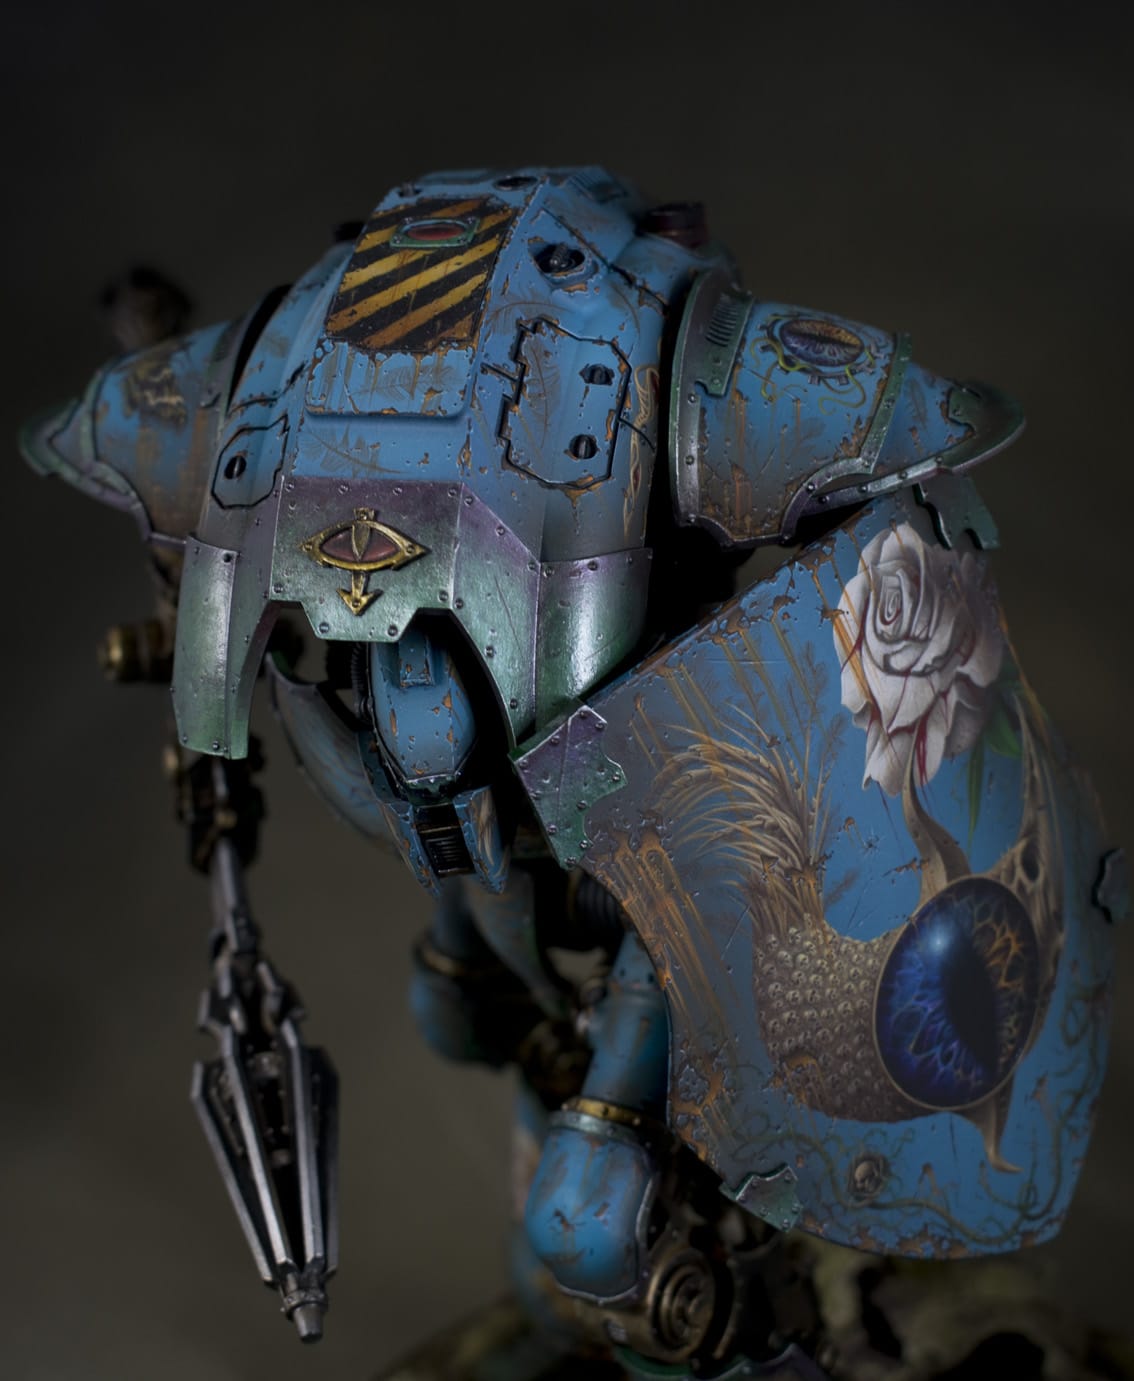
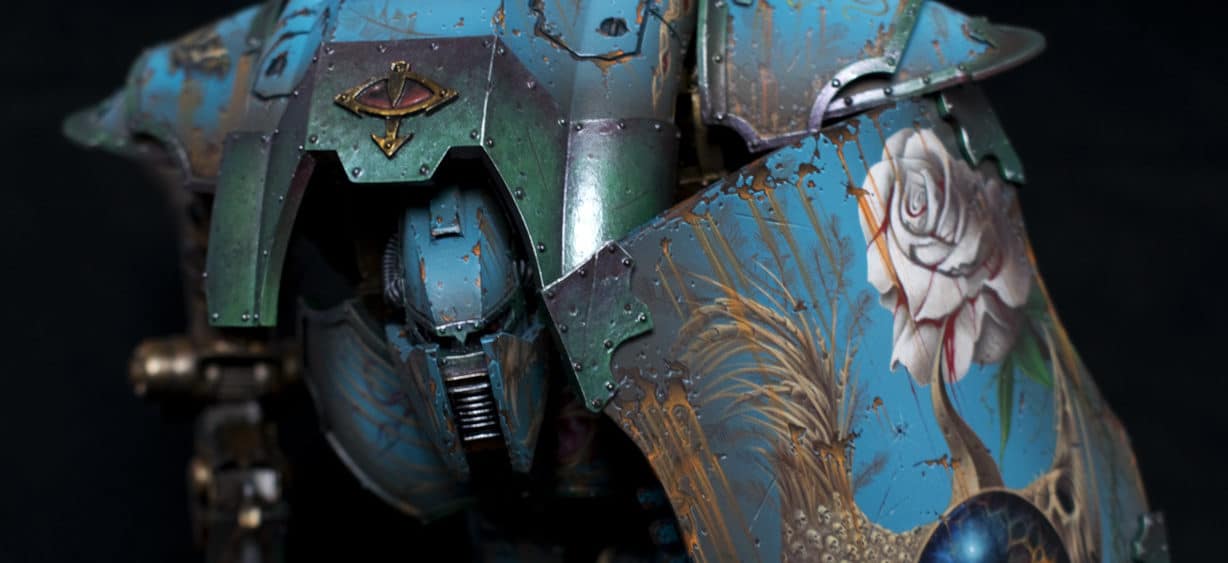
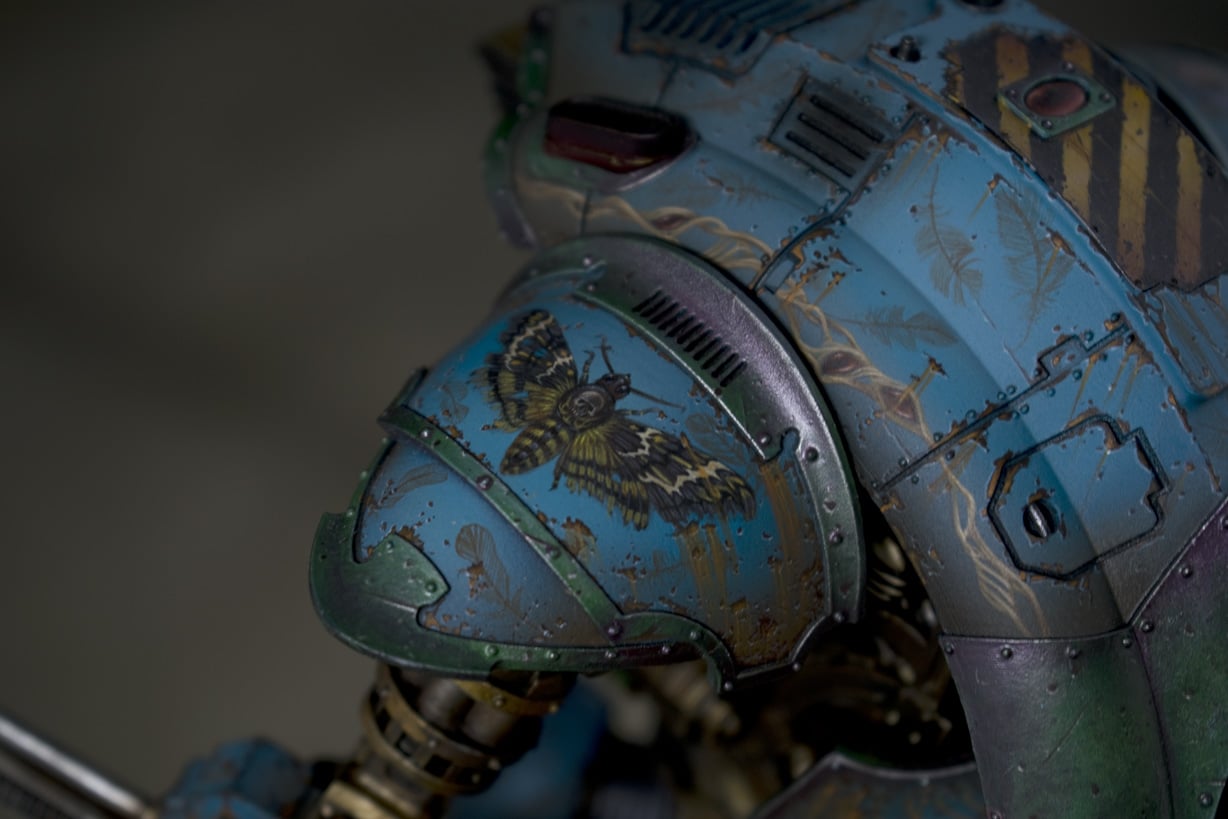
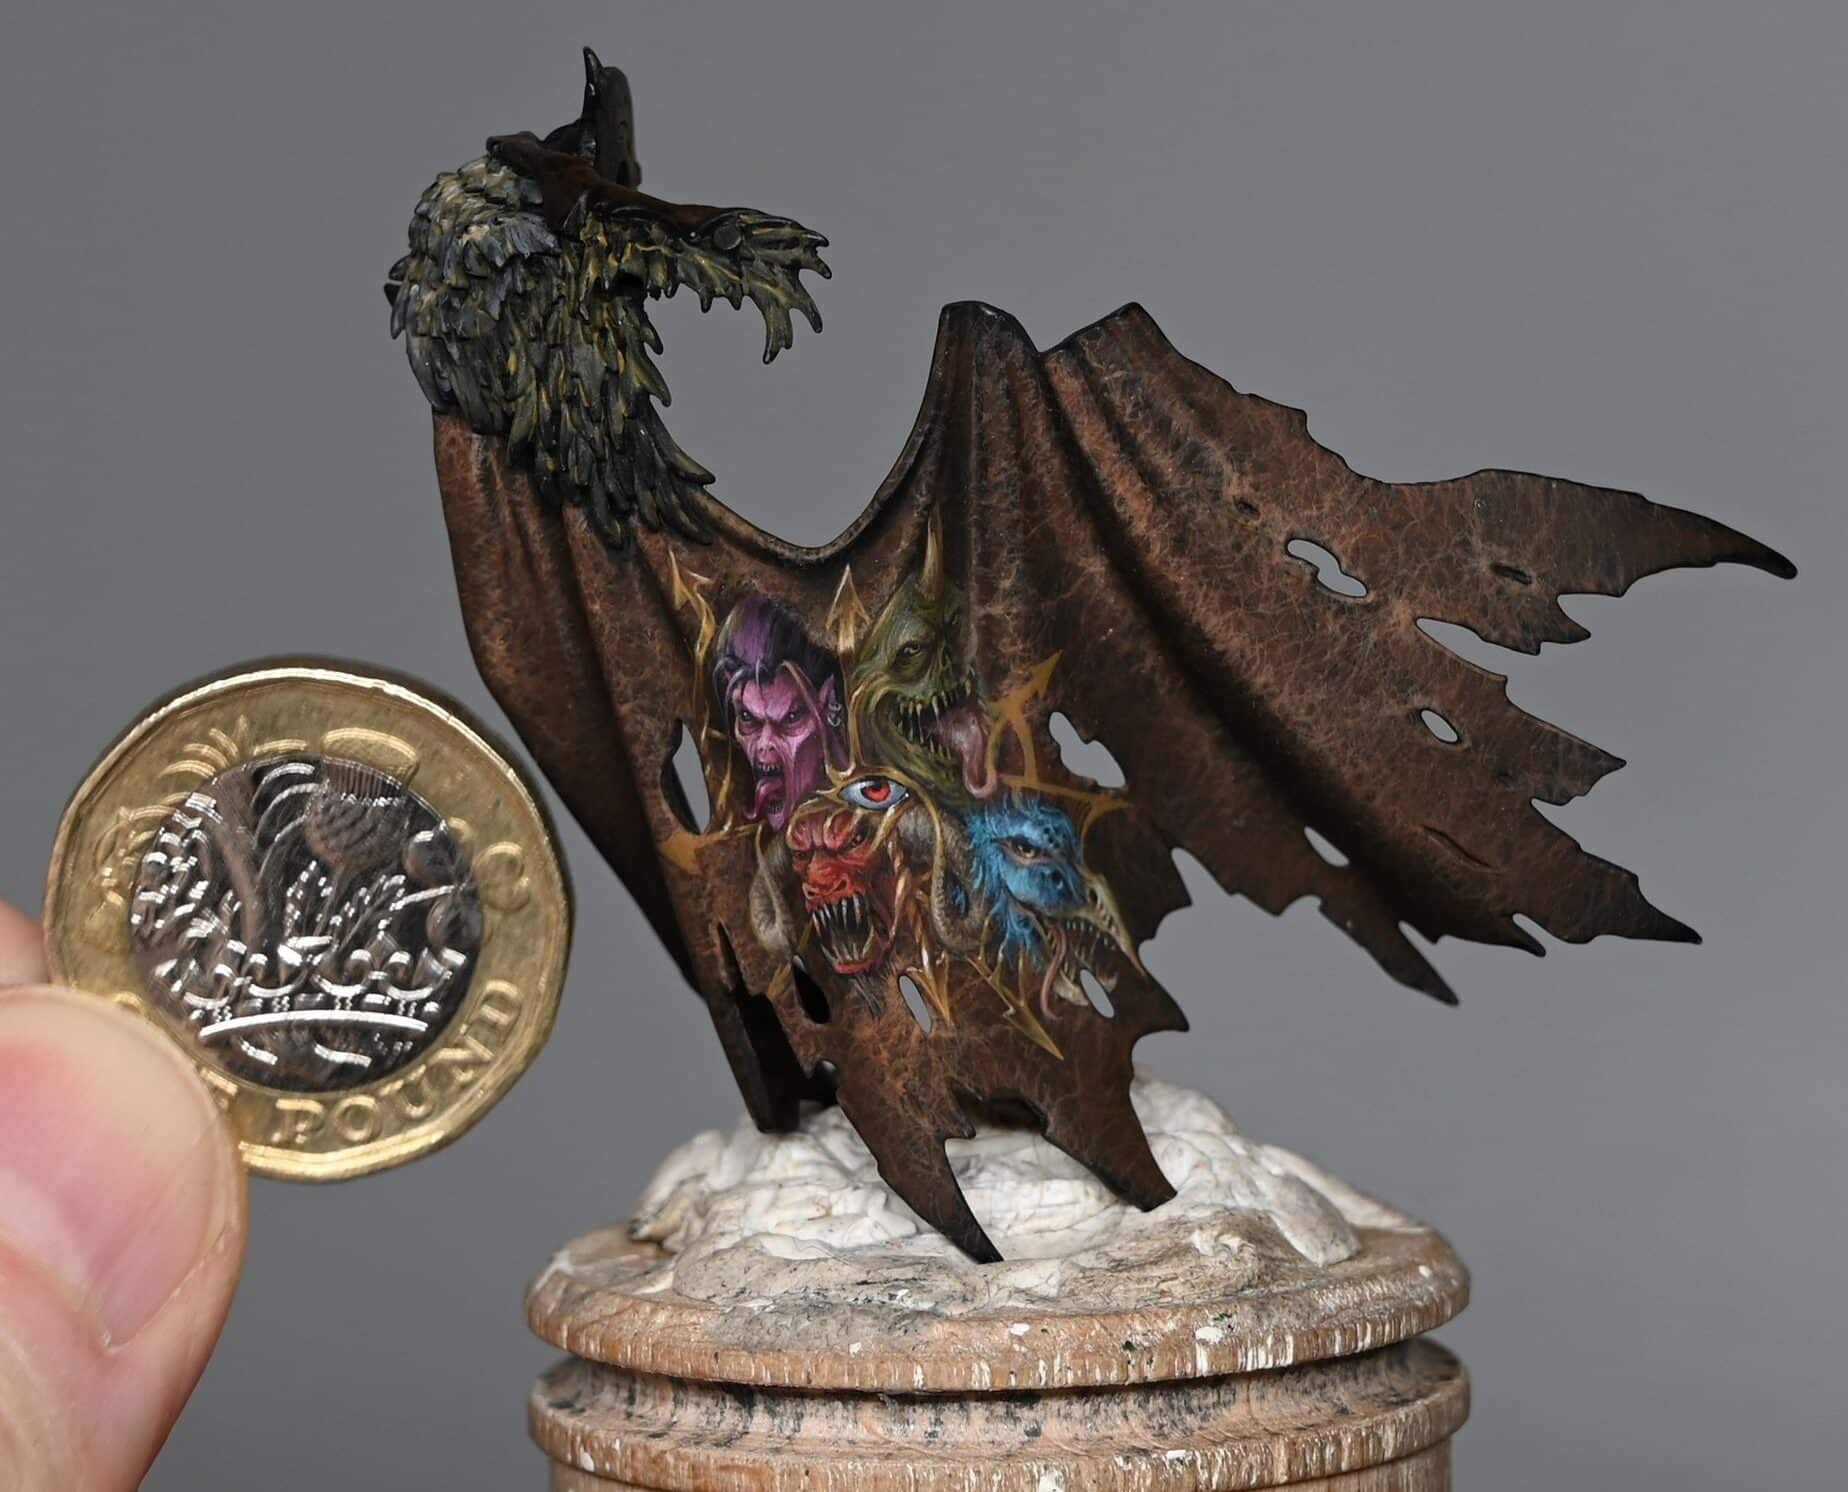
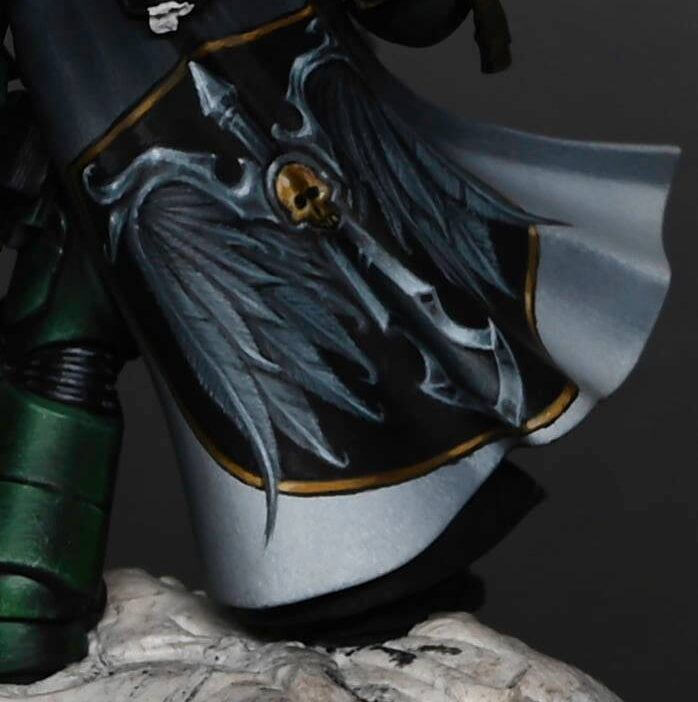
 Demon Wing Details First steps and basics For a pdf on how I cleaned the wing ready for painting, visit : https://richardgraycreations.com/mortarion-wing-prep-pdf/ ) All videos are recorded in HD 1080p or higher – use full screen for the full effect and let the video load completely. Demon Wing Details: Part One The following paints were used:Games Workshop: Rhinox Hide, Yriel Yellow, Kislev Flesh, Cadian Fleshtone, Moot Green, Xereus Purple, Evil Sunz Scarlet*note, in the video I show Emperor’s Children and Death Guard Green. These were not used in this video. Vallejo: Ivory Demon Wing Details: Part Two The following paints were used:Games Workshop: Mournfang Brown, Cadian Fleshtone, Kislev Flesh, Xereus Purple, Valejo: Ivory Demon Wing Details: Part Three The following paints were used:Games Workshop: Cadian Fleshtone, Kislev Flesh, Rhinox Hde, Xereus Purple, Vallejo Model Colour: Ivory Step by Step Tips: How to Paint Mortarions Wings – Demon Wing Details Part One: 
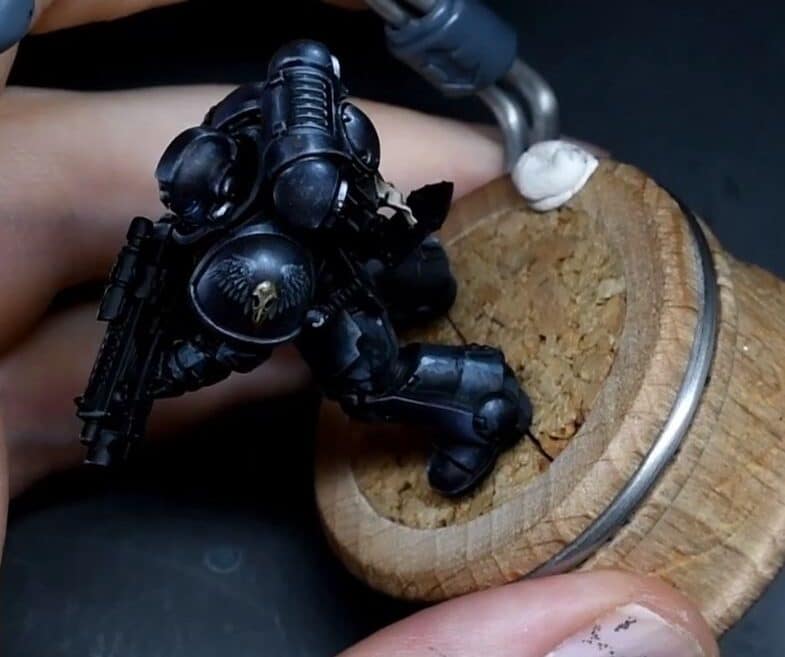
Prepare the Model: Confirm that the model has been properly primed, and any base colors, such as carmine, have been applied. Take a moment to inspect the model and identify any pre-painted outlines or details. Outline with Rhinox Hide: Utilise Rhinox Hide to start painting the outlines on the wings. This step involves creating the base pattern and initial details. Opt for Rhinox Hide over black to match the desired fleshy tone of the wings. Paint Veins with Xereus Purple: Select Xereus Purple to paint the vein-like details on the wings. Use a larger brush for broader coverage and to establish the initial structure. The combination of Xereus Purple and Rhinox Hide will give a dark, diseased appearance to the veins. Add Variation to Veins: Pay attention to the thickness and variation of the veins. Make deliberate wiggles and different shapes to create depth and interest. Ensure that the veins go over some of the previously painted thick lines for a more realistic effect. Consider Viscosity of Paint: Observe the viscosity of the paint; it should be thick enough to allow for fine lines. This is crucial for painting detailed and thin veins. You can load the brush more freely when using a thicker paint. Add Vein Details: Paint thin lines of purple coming out from certain areas, resembling veins spreading out. Use the thickness of the brush to your advantage, allowing for both longer lines and finer details. Introduce Spot Colours: Incorporate spot colours using Moot Green from Games Workshop. These spots will contrast with the purple, adding visual interest to specific areas, like craters on the wings. Highlight Veins: Highlight the veins by using Kislev Flesh, creating a raised vein effect. This will add depth and dimension to the wing. Soften Edges and Add Shadows: Use glue to soften edges and make the veins appear less pustule-like. Introduce shadow areas around the veins to enhance the three-dimensional look. Plan Lighting Directions: Consider the lighting directions on the model. Reflective lights and multiple light sources can contribute to a realistic 3D effect. Think about how the light interacts with the various elements on the wings. Part Two: Set Up Your Palette: Arrange your paints on the wet palette, as shown in the top right corner of the video. Let them mix a bit for added variation in your application. Begin with Cadian Fleshtone: Using Cadian Fleshtone, highlight the small segments between the veins. Focus on the upper areas to mimic light hitting from above. Use Reasonable Dilution: Ensure the paint is reasonably diluted, allowing for smoother application. As you’re highlighting, create the impression of shadows by avoiding direct application on dark vein edges. Utilise Mournfang Brown and Xereus Purple: Outline details with Mournfang Brown, and use Xereus Purple to add depth. These details may evolve organically as you progress. Fine-tune with a Sharp Brush: For fine details, use a sharp-tipped brush. Paint slightly thicker than usual, taking advantage of the wet palette to maintain consistency. Create Organic Look: Emphasise the fleshy and organic feel by avoiding a precise pattern. Moths and butterflies inspire the style, but the focus is on a fleshy appearance. Observe Light Source: Keep the light source in mind while highlighting. Work on veins to create shadows, ensuring a dynamic and realistic look. Add Transition Colours: Utilise mixed-up areas on the palette for transition colours. This adds depth and enhances the shadow effect, especially on larger, rounder areas. Experiment with Xereus Purple Outlining: Experiment with Xereus Purple outlining to enhance details. Remember, fine details may evolve as you progress, creating a unique and organic look. Balance the Details: Constantly tweak and balance details as you go. Ensure the veins, fleshy areas, and fine details complement each other for a cohesive appearance. Keep Consistency: Maintain consistency in the colour palette but vary the ratio of colours. This provides variation while adhering to a cohesive theme. Avoid Exaggeration: While enhancing details, avoid exaggeration. The goal is to create an organic, fleshy look without turning it into a three-dimensional eyeball. Part Three: Understand the Existing Freehand Progress: Examine the progress of the freehand on the model, especially the veins and patterns. Note that Rhinox Hide comes in two versions, with the thinner one used for glazes and quick transitions. Begin Painting the Veins: Start with Rhinox Hide to paint veins, emphasizing the connections and flow between them. Be mindful of curves and avoid making the veins look too straight or jarring. Create Veins as Eyelashes: Connect the veins to the eye, using them as eyelashes. This adds a unique and natural touch to the model, representing an organic connection between the eye and wing. Add Variation to Veins Around Holes: Paint veins around holes using Xereus Purple, varying the pattern to avoid repetition. Darken the area around the hole for contrast and tonal variation. Adjusting Freehand for a Cohesive Look: As the freehand progresses, ensure that the details flow well with each other, avoiding a disconnected appearance. Veins should follow the natural contours of the wing. Layering for Depth: Layer veins to create depth, using Kislev Flesh and Ivory for highlights. This technique makes the veins appear more 3D and layered. Darken and Outline: Darken certain areas using Rhinox Hide to create shadows and depth. Outline veins and details to make them stand out clearly. Highlighting and Refining: Use Vallejo Ivory to highlight specific sections, creating contrast and emphasizing the shapes. Continuously refine and tweak details, keeping an eye on the overall picture. Glazing for Smooth Transitions and Shapes: Use glazing to create smooth transitions between different paint layers. This is particularly useful for blending colours seamlessly. Apply glazes to emphasise the shapes of painted sections, ensuring a smooth and coherent look. Final Touches: Continue refining details, emphasising shapes, and making any final adjustments. Take your time to ensure a high-quality finish. 
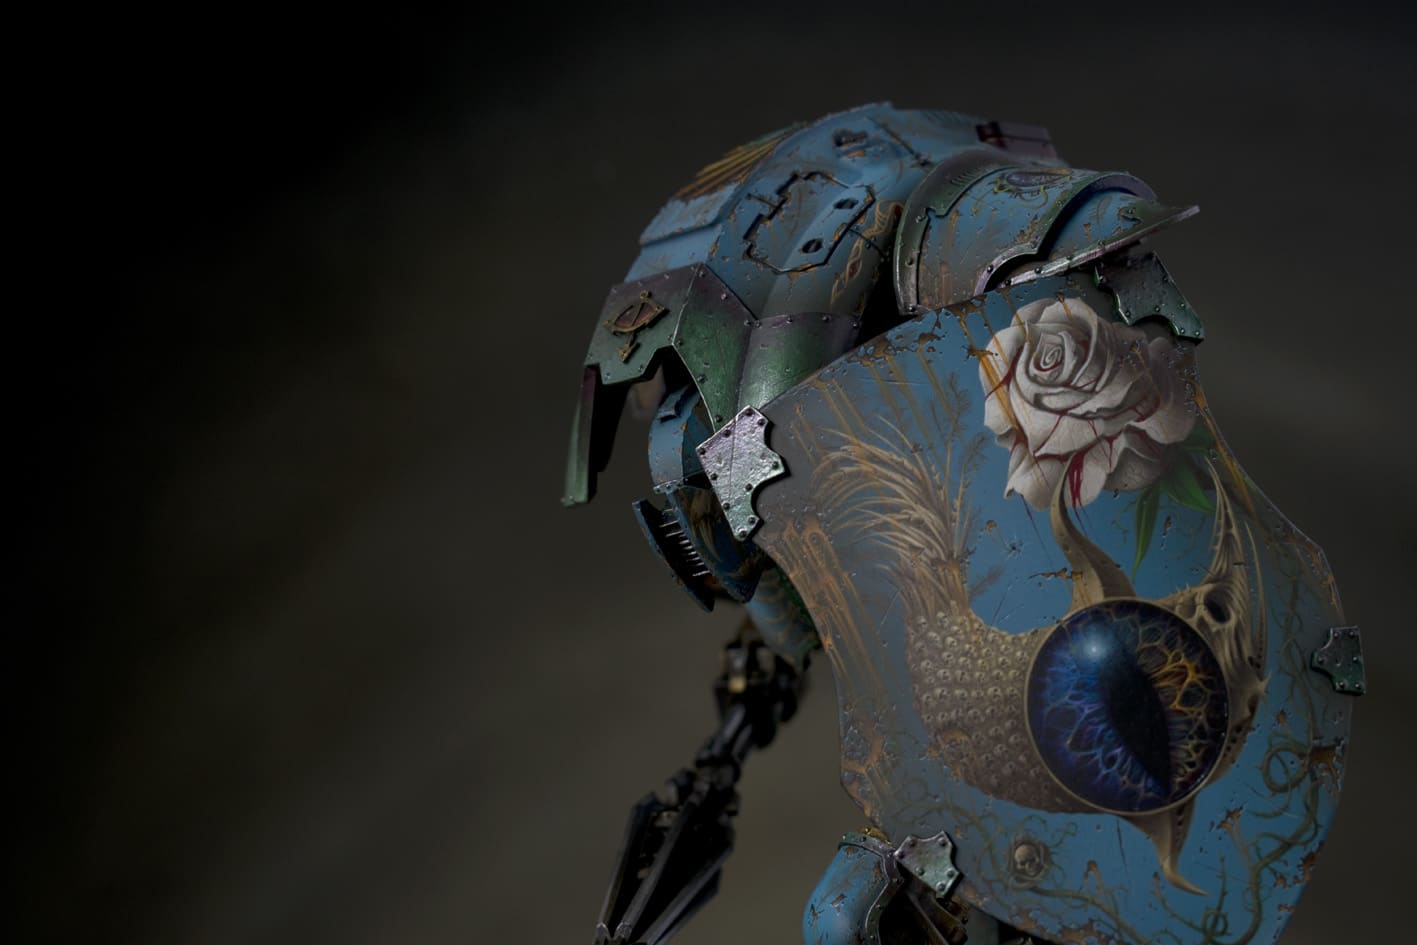
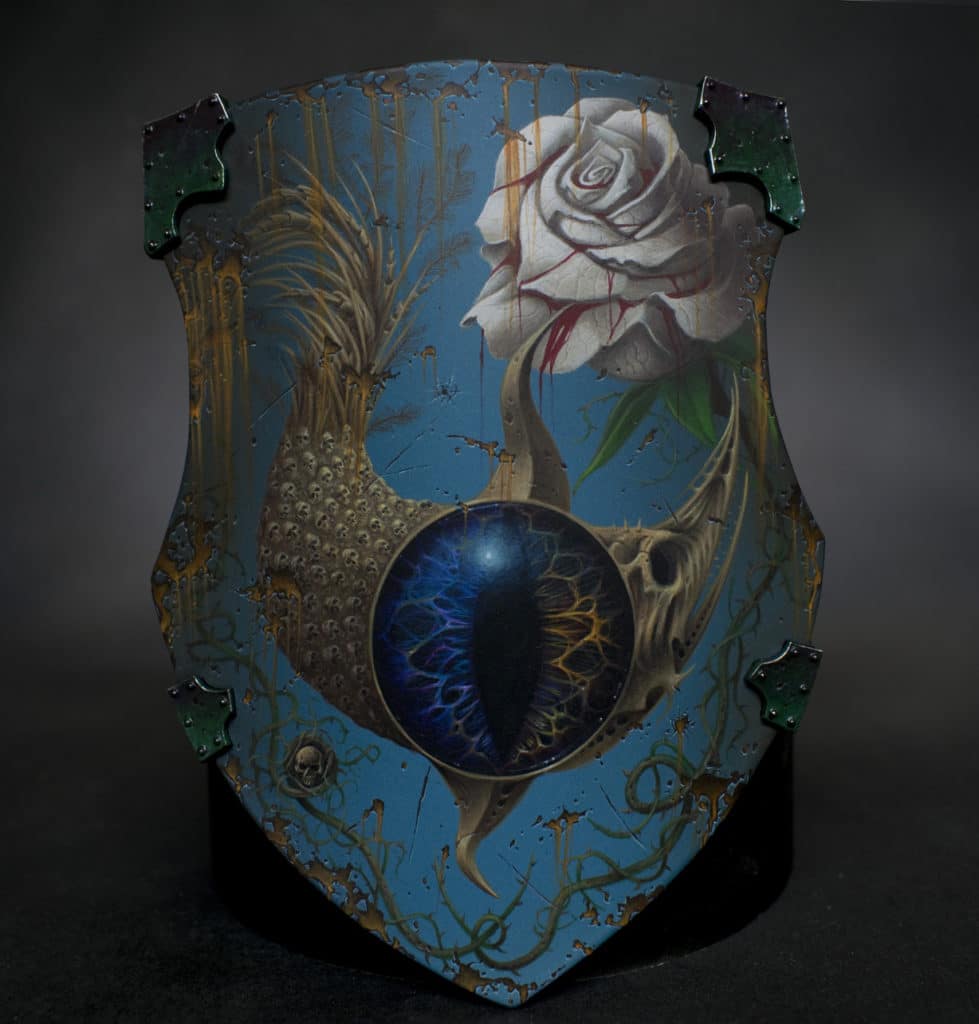
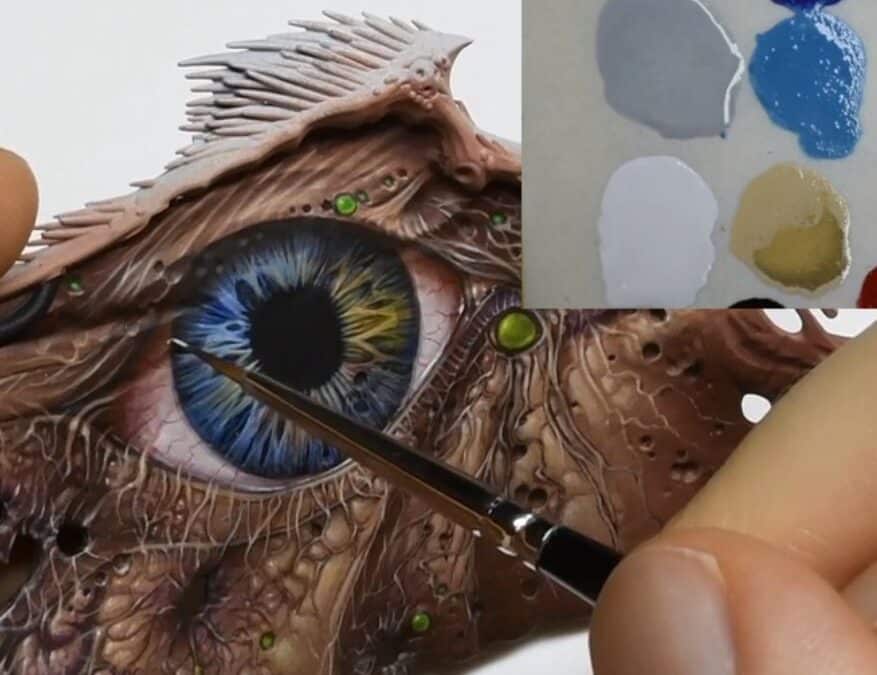
How To Paint Mortarions Wings: Blue Eye The following paints were used:Games Workshop: Cybarite White, Flayed One Flesh, Doombull Brown, Balor Brown, Evil Sunz Scarlet, Lothern Blue, Ahriman Blue (optional) Rhinox Hide Vallejo: Ultramarine Blue, Night Blue (optional) Black, Pale Grey Blue P3: Ryn Flesh Step by Step Tips: How to Paint Mortarions Wings – Blue Eye Start with the Blue Detail on the Eyes: Commence the process by using Ultramarine Blue to paint a circle in the center of the existing black circle on the wing. Precision isn’t crucial at this point; you can refine it later. Refine the Blue Circle: Utilize black paint to clean up and refine the edges of the blue circle, serving as a guideline for the forthcoming details. Add Fine Details with Ultramarine Blue: Apply Ultramarine Blue to create fine lines and intricate details within the circle, representing the complex features of the eye. Allow the lines to follow the organic nature of the wing. Highlight the Blue Details: Use Flayed One Flesh to highlight selected blue details, creating a smooth transition between colours and enhancing the eye’s three-dimensional appearance. Introduce Pale Brown for Depth: Apply Pale Brown to add depth to the eye, concentrating on the lower section of the white. Be cautious not to use excessive paint to preserve the details from earlier steps. Create Highlights with Flayed One Flesh: Revisit Flayed One Flesh to introduce highlights on the blue details, enhancing the overall aesthetic of the eye. Glaze with Pale Grey Blue: Create a glaze using Pale Grey Blue and apply it to specific areas of the eye. This will help blend colours and add a layered effect to the strands and details. Add Red Veins and Details: Carefully reintroduce red veins, resembling eyelashes from the bottom of the eye. Utilize a dragging motion with the brush for precise lines. Correct Mistakes and Refine Detail: If any mistakes occur, use black paint to rectify errors and refine the intricate details, maintaining attention to the shape and flow of the lines. Final Touches on Reflections: Add reflections to the eye using semi-white to highlight the central part of the reflection. Consider the light source and aim for a realistic and captivating result. 
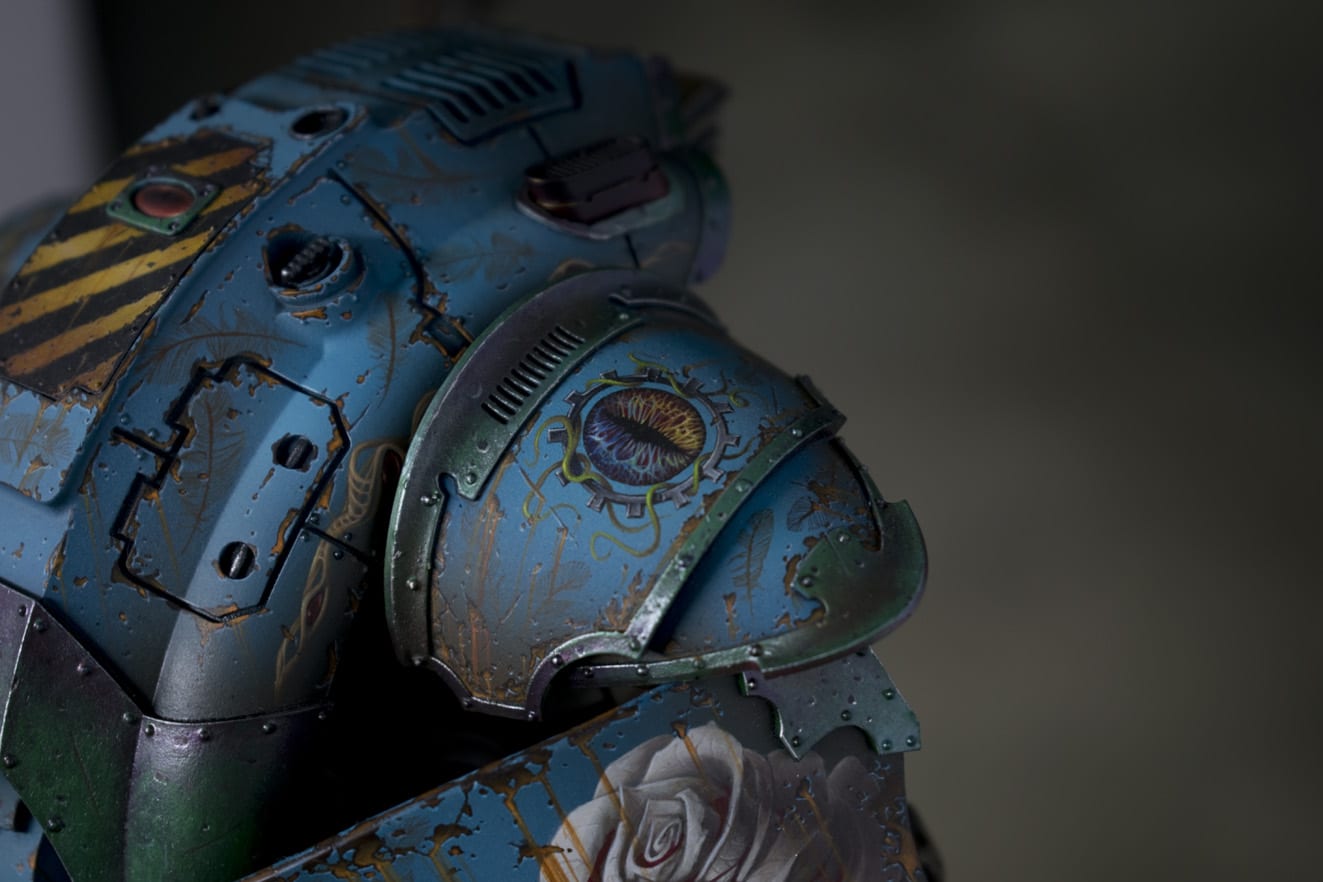
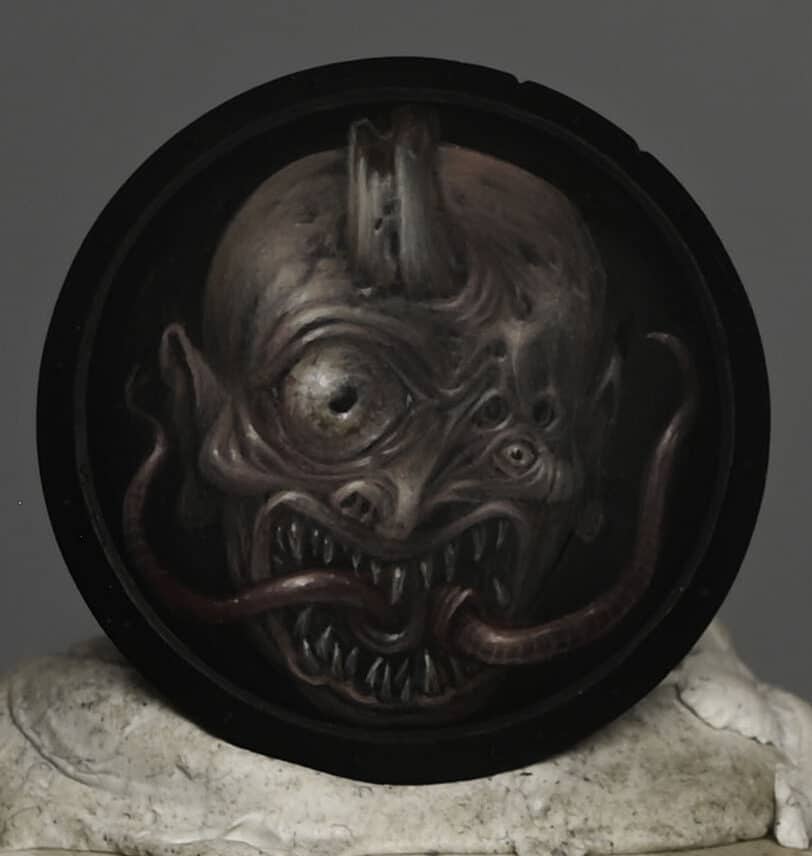
How To Paint Mortarions Wings: Demon Eye The following paints were used:Games Workshop: Mephiston Red, Wild Rider Red, Rhinox Hide Doombull Brown, Zamesi Desert, Yriel Yellow, Moot Green Temple Guard Blue, Sotek Green, Abaddon Black, Cadian Fleshtone, Kislev Flesh, Ceramite WhiteVallejo Model Colour: Ivory, BlackP3: Iosen Green (GW Warpstone Glow alternative) Ryn Flesh Step by Step Tips: How to Paint Mortarions Wings – Demon Eye Outline the Pupil: Begin by outlining the pupil of the eye. Focus on the inner shape rather than the outer, as you can fix any wonkiness later. Paint the Iris: Using a spread-out pattern, carefully paint the lines of the iris, starting from the center and moving outwards. Use a lighter colour to highlight some imperfections and indentations on the wing. Refine the Lines: Separate the lines, especially around the Nurgle symbol. Use Abaddon Black as a rubber to create a rough outline and add depth to the design. Introduce Different Colours: Experiment with different colours such as Temple Guard Blue and Wild Rider Red to add layers and details. Don’t be afraid to mix colours on the brush for a varied effect. Paint the Sclera: Apply Temple Guard Blue to the sclera, ensuring a smooth transition from the red, and be cautious not to paint over the detailed lines. Enhance Highlights: Use Ceramite White to brighten the eyes, creating a strong contrast. Paint carefully, following the shape of the eye for a rounded and natural look. Add Veins: Use Mephiston Red to paint veins onto the white of the eye, creating a realistic effect. Keep the lines subtle and centered for a natural appearance. Apply Glazes: Use glazes to soften transitions and tie the piece together. Deploy glazes by loading the brush from the wet palette. Final Highlights: Highlight with Ivory to emphasize details on the veins and enhance the overall look. Add Reflections: Apply White to the reflections on the eye to give it a lifelike and 3D effect. Create Wetness Effect: Using a small amount of Kislev Flesh or a similar colour, add small irregular dots to represent the wetness of the eye. Need more Mortarion? Check out the other tutorial videos, below: Free Video Tutorials Free videos (for logged in members – just sign up as a ‘friend’ to view and click any of the thumbs.To explore all of these, visit this page! If you don’t have an account, please sign up here! The website currently has over 350 video tutorials, plus step by step guides and PDFs. You can explore more free videos with a free “freebies” membership, or take the plunge and become a full subscriber for full access. If you’d prefer to support me on Patreon, please visit: https://www.patreon.com/RichardGray [...]
Video Tutorial : How to Paint Mortarions Blue Eye
A video tutorial with paints and a step-by-step guide on How to Paint Mortarions Blue Eye on his wings. How to Paint Mortarions Blue Eye The following paints were used:Games Workshop: Cybarite White, Flayed One Flesh, Doombull Brown, Balor Brown, Evil Sunz Scarlet, Lothern Blue, Ahriman Blue (optional) Rhinox Hide Vallejo: Ultramarine Blue, Night Blue (optional) Black, Pale Grey Blue P3: Ryn Flesh Step by Step Tips: How to Paint Mortarions Blue Eye Start with the Blue Detail on the Eyes: Commence the process by using Ultramarine Blue to paint a circle in the center of the existing black circle on the wing. Precision isn’t crucial at this point; you can refine it later. Refine the Blue Circle: Use black paint to clean up and refine the edges of the blue circle, serving as a guideline for the forthcoming details. Add Fine Details with Ultramarine Blue: Apply Ultramarine Blue to create fine lines and intricate details within the circle, representing the complex features of the eye. Allow the lines to follow the organic nature of the wing. Highlight the Blue Details: Use Flayed One Flesh to highlight selected blue details, creating a smooth transition between colours and enhancing the eye’s three-dimensional appearance. Introduce Pale Brown for Depth: Apply Pale Brown to add depth to the eye, concentrating on the lower section of the white. Be cautious not to use excessive paint to preserve the details from earlier steps. Create Highlights with Flayed One Flesh: Revisit Flayed One Flesh to introduce highlights on the blue details, enhancing the overall aesthetic of the eye. Glaze with Pale Grey Blue: Create a glaze using Pale Grey Blue and apply it to specific areas of the eye. This will help blend colours and add a layered effect to the strands and details. Add Red Veins and Details: Carefully reintroduce red veins, resembling eyelashes from the bottom of the eye. Utilize a dragging motion with the brush for precise lines. Correct Mistakes and Refine Detail: If any mistakes occur, use black paint to rectify errors and refine the intricate details, maintaining attention to the shape and flow of the lines. Final Touches on Reflections: Add reflections to the eye using semi-white to highlight the central part. All videos are recorded in HD 1080p or higher – use full screen for the full effect and let the video load completely. Need more Mortarion? Check out the other tutorial videos, below: Free Video Tutorials Free videos (for logged in members – just sign up as a ‘friend’ to view and click any of the thumbs.To explore all of these, visit this page! If you don’t have an account, please sign up here! The website currently has over 350 video tutorials, plus step by step guides and PDFs. You can explore more free videos with a free “freebies” membership, or take the plunge and become a full subscriber for full access. If you’d prefer to support me on Patreon, please visit: https://www.patreon.com/RichardGray [...]
How to Paint Deathshroud Terminator Cloak Freehand
How to paint a Deathshroud Terminator Cloak using freehand. This model won me a Golden Demon in 2017! These models represent the grotesque and decay-themed warriors of Nurgle, a faction known for their resilience and corrupted, plague-ridden aesthetics. So, in these tutorials we are aiming to enhance the models’ appearance with detailed faces and textures on their cloaks! Quick note here – these are some of my earliest tutorial videos, so are not of the same quality as my current tutorials visually and sound-wise. My apologies for this.Richard Video: Deathshroud Terminator Red Cloak This process results in a textured, worn cloak suitable for a Death Shroud Terminator, using a simple but effective painting technique. Materials and Paints Used Gal Vorbak Red (Forge World) Cadian Fleshtone (Games Workshop) Eldandil Violet (Scalecolour Fantasy) Step by Step Guide Base Coat: Start with Gal Vorbak Red as the primary colour. Detailing and Texture: Use Cadian Fleshtone for adding highlights and texture, creating a worn and mouldy appearance. Shading: Apply Eldandil Violet for shading in the recesses, enhancing depth and wear. Glazing with Evil Sunz Scarlet: Use it as a glaze to add warmth to the cloak. Refining Texture: Focus on cross-hatching movements to build texture, emphasizing the worn look. Final Touches: Add further glazes and highlights to refine the texture and depth, tailoring the effect to your desired level of detail. Video: Deathshroud Terminator Cloak Freehand Materials and Paints Used The following paints were used:Games Workshop: Rhinox Hide Vallejo: Heavy Brown, Cork Brown, Ice Yellow, Black P3: Battlefield Brown *Note, Morrow White was not actually used in this video, but is used in part 2. Step by Step Guide Preparation: I used a test model to experiment with my design concept. This approach allows you to refine the freehand pattern before applying it to the main models. Base Colours: Apply Vallejo Heavy Brown as a foundational colour. Enhance the base with Cork Brown for a richer texture. Use Rhinox Hide to outline the design, ensuring the lines are crisp and distinct. Detailing: Carefully mark the eye sockets with black paint, paying attention to the cloak’s folds. These details will add depth and character to the freehand design. Highlighting: Utilize Ice Yellow for highlights. This step involves blending the highlights with the base colors to achieve a natural, integrated look. The highlights should accentuate the topography of the cloak and enhance the freehand design. Shading: Use Battlefield Brown to deepen the shadows and add complexity to the design. This shade will create a more dynamic and realistic appearance on the cloak. Finishing Touches: Review the entire design, making final adjustments for consistency and balance. Focus on refining the freehand artwork, ensuring it harmonizes with the cloak’s texture and the overall theme of the model. Video: Deathshroud Terminator Cloak Freehand Refinement Materials and Paints Used The following paints were used: Games Workshop: Cadian Fleshtone, Pallid Wych Flesh, Bugman’s Glow, Rhinox Hide, Loren Forest, Nurgling Green, Vallejo: Ice Yellow, Cork Brown, Black, Neutral Grey, Pale Grey Blue, Heavy Brown P3: Battlefield Brown, Morrow White Step by Step Guide Base Preparation: Start by painting a rough base of fleshy shapes using Cadian Fleshtone. This initial layer doesn’t need to be perfect or smooth. Detailing Ears and Face: Add ears to distinguish the image from a skull, creating a more zombie-like face. Use Kadeem Flesh Tone for this step. Sketching Flesh and Bone: Sketch out areas where flesh appears torn or missing, revealing bone underneath. This technique enhances the undead appearance and integrates the existing skull highlights. Adding White Highlights: Use Pallid Wych Flesh to accentuate bone areas, making them stand out from the flesh tone. Painting the Eyes: Employ Neutral Grey, followed by Pale Grey Blue for the eyes. Add white dots in the center and top left corner of each eye for a lifelike effect. Mouth and Teeth Details: Refine the mouth and teeth using Rhinox Hide and Ice Yellow for highlights. Focus on defining the teeth shapes and adding depth to the mouth. Adding Texture to Flesh: Use Bugman’s Glow and other flesh tones to create textured, worn skin. Apply these tones in layers, allowing the underlying skull details to peek through. Final Touches: Finish by adding fine details and additional highlights to enhance the depth and realism of the freehand design. The key to this process is building up the layers gradually, refining the details as you go, a More Deathshroud Tutorials How to Paint Deathshroud ArmourDeathshroud Scythe Handle WrappingDeathshroud Terminator Cloak FreehandHorn Painting Guide All Deathshroud Bodyguard Video Tutorials Death Guard Deathshroud Bodyguard A series of video tutorials on how I painted my set of Golden Demon winning Death Guard Deathshroud Bodyguard! This includes nurgly armour, weathering, rust, metals, tentacles, freehand and more! Watch Now More Freehand Tips: If you don’t have an account, please sign up here! The website currently has over 350 video tutorials with steps and tips, plus a selection of PDFs. If you are not sure about joining, you can explore my free videos with a free membership, or take the plunge and become a full subscriber for full access. If you’d prefer to support me on Patreon, please visit: https://www.patreon.com/RichardGray [...]
How to Paint Wing Freehand on a Space Marine Shoulder Pad
Learn how to paint wing freehand on a Space Marine shoulder pad in this tutorial, with step-by-step guide including paints and materials needed. This marine has lots more videos to follow, if you’d like to follow the link below! Or, if you are just interested in the freehand, scroll down to explore. Black Marine A set of video tutorials on how I painted this black marine, including small freehand tips, subtle weathering, leather and nmm gold detailing. Watch Now Video: How to Paint a Freehand on a Space Marine (bird skull and wings) Materials Needed Games Workshop paints: Balor Brown, Ushabti Bone Vallejo paints: German Grey, Neutral Grey, Heavy Bluegrey Fine detail brushes for the intricate work (I use the Artist Opus range). A wet palette to keep your paints thinned and workable A Space Marine model with a shoulder pad primed and base coated Step by Step Guide to Freehand on a Space Marine Step 1: Base Sketch – Start with a rough sketch of the raven skull in the centre of the shoulder pad using Balor Brown. Aim for an upside-down teardrop shape for the skull, keeping the paint light and not worrying about solid color or precise shape at this stage. Step 2: Highlighting Background – Before detailing the freehand, ensure the shoulder pad is highlighted properly. This includes spot highlights and broader highlights to emulate light reflection. These will later integrate with the highlights on the freehand design. Step 3: Painting the Wings – Using Neutral Grey by Vallejo, paint the rough shape of the wings flaring from the sides of the skull. The wings should be asymmetrical but balanced, with feathers ruffling outward. Utilize German Grey to add depth and shading, creating a transition between the colours and the black of the armour. Step 4: Detailing the Skull – Refine the raven skull, paying special attention to its beak and eye sockets. Use German Grey to outline and add depth, ensuring the skull retains its distinct shape against the black armour. For the tip of the beak, maintain a dark but slightly contrasted tone to distinguish it from the background. Step 5: Feather Texture – Gradually build up the feather texture on the wings using a combination of Neutral Grey and German Grey. Paint the feathers with a fine brush, starting from the base of the wing and working outwards, increasing in size. This creates a natural feathered effect. Step 6: Final Highlights and Details – Use Ushabti Bone to add highlights to the skull, focusing on the top edges and the eye sockets to enhance its dimensional appearance. Apply Heavy Bluegrey for the final highlights on the wings, blending them into the armour’s highlights for a cohesive look. Step 7: Finishing Touches – Review the entire piece, adding final adjustments to the skull and wings as necessary. You may need to retouch some areas to ensure a smooth gradient and correct any overspill. The aim is to have a clear, recognisable raven symbol that integrates well with the armour’s existing highlights and shadows. Step 8: Sealing the Work – Once you’re satisfied with the painting, allow it to dry thoroughly. Consider sealing the model with a matte varnish. All videos are recorded in HD 1080p or higher – use full screen for the full effect and let the video load completely. Latest Freehand Tutorials: If you don’t have an account here on my website, please sign up here! I have over 350 video tutorials with steps and tips, plus a selection of PDFs. If you are not sure about joining, you can explore my free videos with a free membership, or take the plunge and become a full subscriber for full access. If you’d prefer to support me on Patreon, please visit: https://www.patreon.com/RichardGray [...]
How to Paint Scorpion Freehand on the Ogroid Myrmidon Shield
Video guides and step-by-steps on how to paint the Warcry Ogroid Myrmidon shield with this Scorpion Freehand. Video: Scorpion Freehand First Steps This first part of the tutorial covers the preparation and beginning stages of scorpion freehand painting on the Ogroid Myrmidon’s shield Materials Needed: Primer: Black Base Colours: XV-88, Mournfang Brown, Zandri Dust, Morghast Bone (All Games Workshop) Detailing: Model Colour Black (Vallejo) Tools: Scalpel, fine-grit sandpaper, large and fine brushes, wet palette Preparation: Preparing the Shield: Remove the model’s original shield detail using a scalpel and fine-grit sandpaper to create a smooth surface for freehand painting. This process ensures a flat canvas for your artwork. Priming: Prime the entire model, including the shield, in black to provide a uniform base coat. If desired, apply an underglow effect with Mephiston Red using an airbrush on the model’s underside for atmospheric lighting. Painting the Shield’s Background: Base Layer: Start by applying XV-88 in multiple thin layers to achieve an opaque finish. Mix approximately one part water to one part paint, using a fairly large brush for broad strokes. Patience is key; allow each layer to dry thoroughly. Blending: While the XV-88 base is still workable, begin blending Mournfang Brown from the bottom of the shield upwards. This technique creates a gradient effect that adds depth to the shield’s background. Highlighting and Texture: Use Zandri Dust and Morghast Bone to introduce highlights, particularly focusing on the top of the shield where light naturally hits. This process also starts to introduce the worn, textured look desired for the shield. Brush Techniques: To achieve a smoother blend and avoid harsh brush marks, employ cross-hatching and other texturing techniques with your brush. This approach will help create a more natural transition between colours. Glazing for Smoothness: After the initial layering and texturing, apply glazes of the same colours (XV-88, Mournfang Brown, Zandri Dust, Morghast Bone) diluted with water (about six or seven parts water to one part paint). Glazing helps smooth out transitions and enrich the colour depth. Starting the Scorpion Freehand: Design Placement: Before starting the scorpion freehand, consider the shield’s round shape and ensure your design aligns properly with the model’s orientation. Use the back of the shield as a reference to determine the top and bottom. Sketching the Design: With Model Colour Black, begin sketching your scorpion freehand design. For this tutorial, a scorpion motif is used. Start with basic shapes and outlines, keeping the lines thin and manageable. This stage is about laying down the design’s foundation, so precision is more important than coverage. Refining the Design: Gradually thicken and refine the outlines of your scorpion freehand design, paying close attention to symmetry and proportion. Adjust the thickness of the lines to create depth and interest. Correcting Mistakes: If you make any errors or wish to adjust the design, you can cover mistakes with the base colours (XV-88, Mournfang Brown, Zandri Dust, Morghast Bone). This step may require reapplying glazes to blend the corrections into the background. Video: Scorpion Freehand Refinement and Details Looking at rendering the freehand scorpion to achieve a three-dimensional appearance and then weathering the shield for a battle-worn look. Additional Materials: A wet palette to keep paints hydrated and to mix custom colours. Fine grit sandpaper for smoothing the shield surface after modifications. A scalpel or hobby knife for removing details from the shield. Water container for rinsing brushes. Paper towels or a clean cloth for brush drying and paint removal. Mixing palette for creating custom colours and diluting paints for glazing. Hairdryer (optional) for speeding up the drying process between layers. Sponge (optional, not used but mentioned) for creating textured weathering effects. What do These Techniques Mean?: Pointillism and Stippling: For creating textured effects on the scorpion’s carapace. Glazing: Thin layers of paint applied to subtly shift colours or blend transitions. Fine Detail Work: Using the very tip of a fine brush to outline and add intricate details to the scorpion. Weathering: Applying chips, scratches, and wear to both the scorpion and the shield’s surface to create a battle-worn look. Paints: Games Workshop (Citadel): Mournfang Brown XV-88 Zandri Dust Morghast Bone Naggaroth Night Khorne Red Corax White (for mixing and creating lighter tones) Vallejo: Neutral Grey Dark Grey Warm Grey Pale Grey Blue Model Colour Black (for outlining and fine details) P3 (Privateer Press): Morrow White Iyanden Yellow (mentioned as a substitute for Iosen Green for brighter effect) Rendering the Scorpion Base Layer: Begin with Neutral Grey for stippling and pointillism across the scorpion, creating texture and initial shadows. This technique simulates the scorpion’s shiny carapace. Changing Techniques: Partway through, you might find the style needs adjustment to better represent the scorpion on a smaller scale. While aiming for realism, ensure the final look is visually appealing on the model. Colour Palette Adjustment: Add Warm Grey and Pale Grey Blue to introduce subtle tonal variations, enhancing the scorpion’s three-dimensional appearance. Highlighting: Use Morrow White sparingly for the highest highlights, focusing on areas like the pincers, the body segments, and the stinger to emphasize their importance and shininess. Colour Glazing: Apply thin glazes of Naggaroth Night and Iyanden Yellow (substituted for Iosen Green for a brighter effect) to add colour depth without overpowering the grey tones. This step subtly alters the scorpion’s colour while maintaining its overall grey appearance. Weathering the Shield Preparation: Use the base colours (Mournfang Brown, XV-88, Zandri Dust, Morghast Bone) to match the weathering effects to the shield’s underlying tones. Technique: Apply small, opaque marks with Dark Grey and Neutral Grey to simulate chips and wear, focusing on areas that would naturally receive more damage. Use a fine brush for precision. Detailing: Enhance the weathering with thin lines and stippling, simulating scratches and abrasions. This creates a realistic effect of battle damage across the shield, including over the scorpion design. Integration: To integrate the scorpion with the shield’s weathered look, apply thin glazes of Mournfang Brown over the entire design. This unifies the scorpion with the shield’s background, softening contrasts and blending the freehand work into the overall shield design. Colour Highlights: For areas requiring correction or emphasis, use the shield’s base colours, adjusted one shade lighter, to subtly highlight edges and details, ensuring the scorpion remains the focal point. How to Paint an Ogroid from Games Workshop – Step-by-step guides: Ogroid Myrmidon A selection of detailed videos including red OSL, NMM, fur effect, horns and freehand on his shield. Watch Now More Freehand Tutorials If you don’t have an account, please sign up here! The website currently has over 350 video tutorials with steps and tips, plus a selection of PDFs. If you are not sure about joining, you can explore my free videos with a free membership, or take the plunge and become a full subscriber for full access. If you’d prefer to support me on Patreon, please visit: https://www.patreon.com/RichardGray [...]
How to Paint a Legio Sinister Freehand on the Adeptus Titanicus Warlord Titan
Welcome to this detailed guide on how to paint the Legio Sinister freehand symbol for a Warlord Titan. I will be using various Games Workshop and Vallejo paints to achieve a polished and striking look. This guide is suitable for intermediate to advanced hobbyists due to the precision required in freehand painting. Video – Legio Sinister FreehandPaints UsedSteps and Tips for the Legio Sinister FreehandStep By Step Image GuideMore Freehand Tutorials on the WebsiteFree Video Tutorials Video – Legio Sinister Freehand All videos are recorded in HD 720p or higher – use full screen for the full effect and let the video load completely. Paints Used Vallejo Model Colour Black Games Workshop Paints: Mechanicus Standard Grey, Slaanesh Grey, Grey Seer, Mephiston Red, Mournfang Brown, XV-88, Dorn Yellow, Screaming Skull Steps and Tips for the Legio Sinister Freehand Mapping Out the Position: Begin by using Vallejo Model Colour Black to roughly outline where the symbol will be placed. Start with a small circle at the centre, gradually expanding outwards. Include a line at the top of the curve to centralise the image. Refining the Shape: Progressively enlarge the symbol, focusing on refining its shape. Paint an approximate circle with spikes extending outward. Ensure even distribution of the black paint to provide a solid base for subsequent layers. Applying Initial Colours: Commence with Games Workshop’s Mournfang Brown, applying it as a foundation for the non-metallic parts of the symbol. Layer on XV-88 next, followed by Dorn Yellow, with a focus on the top-left for the lighting direction. Remember, moderate use of Dorn Yellow prevents oversaturation. Adding Highlights: Employ Screaming Skull to introduce highlights. Be judicious in this step, concentrating on the top left to evoke a lustrous appearance. The XV-88 should remain the predominant colour for the metallic aspects. Painting the Lion’s Face: Utilise a range of greys (Mechanicus Standard Grey, Slaanesh Grey, Grey Seer) to depict the lion’s face. Start with basic shapes, refining them progressively. Pay special attention to the eyes, nose, and mouth, building depth with shadows and highlights. Detailing with Red: Apply a glaze of Mephiston Red for a subtle red glow around the eyes and other facial areas. This step enhances the lion’s fierce visage. Adding Fur Details: Use greys to render fur details, commencing with darker shades and progressing to lighter highlights. Focus on creating a three-dimensional effect with varied brushstrokes. Final Details: Paint the Titanicus symbol on the lion’s forehead using black as a base. Layer greys for the non-metallic metal effect, ensuring a thinner central line for a precise appearance. Use Dorn Yellow and Screaming Skull for the highest highlights, ensuring they are well-placed to create a realistic metallic sheen. Refining and Adjusting: As you near completion, revisit areas that require refinement. This may include sharpening edges, deepening shadows, or enhancing highlights. The key is to achieve a balance between contrast and harmony in the symbol’s details. Final Touches: Examine the overall piece for any last-minute adjustments. This might involve intensifying certain colours, smoothing transitions, or adding small details to bring the symbol to life. Ensure the lighting direction is consistent and the symbol stands out against the background. Step By Step Image Guide The team at Warhammer Community approached me for some tips on freehand and I created an article with step by step imagery for the tutorial above – to view it, visit: Tips on Freehand – Step-By-Step Image Guide : Adeptus Titanicus More Freehand Tutorials on the Website Free Video Tutorials Free videos for logged in members – just sign up as a ‘friend’ to view and click any of the thumbs.To explore all of these, visit this page! If you don’t have an account, please sign up here! The website currently has over 350 video tutorials, plus step by step guides and PDFs. You can explore more free videos with a free “freebies” membership, or take the plunge and become a full subscriber for full access. If you’d prefer to support me on Patreon, please visit: https://www.patreon.com/RichardGray [...]
How to Paint a Shoulder Pad Tactical Marking for a Space Marine
In my latest freehand for space marines tutorial “How to Paint a Shoulder Pad Tactical Marking for a Space Marine” we delve into the intricate process of painting the iconic shoulder pad marking for your Raven Guard Space Marine miniature from Games Workshop. Follow along as I break down each step, from laying down the base colour to adding highlights and battle damage, ensuring your model stands out on the battlefield! Video: How to Paint a Shoulder Pad Tactical Marking for a Space Marine All videos are recorded in HD 1080p or higher – use full screen for the full effect and let the video load completely. Step-by-Step: How to Paint a Shoulder Pad Tactical Marking for a Space Marine Prepare the Model – Ensure your Raven Guard Space Marine model is assembled and primed. Make sure to paint the highlights on the shoulder pad before starting on the tactical arrow marking. Painting the Base Colour – Dip your fine detail brush into Vallejo Heavy Greyblue (Celestra Grey) paint. Begin by painting a line straight down the middle of the shoulder pad. Then, work outwards from this line to map the basic shape of the arrow. Focus on neat edges and use the tip of the brush for sharp lines. Refining the Shape – Continue to refine the shape of the arrow, adjusting as needed to ensure symmetry and neatness. Pay attention to the edges, making sure they are clean and precise. Don’t worry too much about perfection, as minor mistakes can be covered with later detailing. Adding Highlights – Using P3 Morrow White (Ceramite White), apply highlights to the arrow. Be cautious not to overlap onto the grey base too much. Focus on creating smooth transitions, blending the white into the grey gradually. Work from the centre of the arrow outwards for better control. Glazing for Smoothness – To achieve a smoother finish, apply glazes of white paint towards the highlight areas. This helps to blend the colours seamlessly and enhances the overall appearance of the marking. Be mindful of brushstrokes and apply the glazes sparingly. Adding Battle Damage – For a weathered look, use Vallejo German Grey (Skavenblight Dinge with a touch of black) to add battle damage to the arrow. Apply tiny marks and scratches strategically, focusing on areas that would naturally wear over time. Be careful not to go overboard, as realism is key. Painting the Red Cord – Switch to painting the red cord that goes over the shoulder. Use Vallejo Amarantha Red (Evil Sunz Scarlet) to carefully paint the cord, layering it to achieve a rich colour. Be mindful not to get any red paint on areas you’ve already finished. Adding Details to the Cord – For added realism, paint on some details such as individual strands on each notch of the cord. Use Citadel Wild Rider Red (Evil Sunz Scarlet) for this, applying thin lines to represent the strands. Take your time and focus on precision. Final Highlights – Finish off the red cord by adding final highlights with Citadel Fire Dragon Bright (Wild Rider Red mixed with a touch of white). Apply these highlights sparingly to the top parts of the cord to maintain consistency. Finishing Touches If needed, do some final touch-ups and adjustments. Use black paint for glazing to tidy up any areas where needed, ensuring a clean and polished look. Step back and admire your painted Shoulder Pad Tactical Marking for a Space Marine! More Space Marine Tutorials! If you don’t have an account here on my website, please sign up here! I have over 350 video tutorials with steps and tips, plus a selection of PDFs. If you are not sure about joining, you can explore my free videos with a free membership, or take the plunge and become a full subscriber for full access. If you’d prefer to support me on Patreon, please visit: https://www.patreon.com/RichardGray [...]
Turquoise Knight Shield Guide – PDF
Turquoise Knight Shield PDF Tutorial A guide to painting the freehand shield for a Knight Lancer. – Richard Turquoise-Knight-Shield-for-Patreon-FINAL-1 Please login to view this content at https://richardgraycreations.com/login/ [...]

Free Freehand Tutorial

Need to make sure I know my stuff before you commit? I got you. Take a look at the below step by step freehand guide and video:

Tips on Freehand – Step-By-Step Image Guide and Video : Adeptus Titanicus

Tips on Freehand – Step-By-Step Image Guide and Video : Adeptus Titanicus

Welcome to this detailed guide on how to paint the Legio Sinister freehand symbol for a Warlord Titan. I will be using various Games Workshop and Vallejo paints to achieve a polished and striking look.

If you don’t have an account, please sign up here! The website currently has over 350 video tutorials with steps and tips, plus a selection of PDFs. If you are not sure about joining, you can explore my free videos with a free membership, or take the plunge and become a full subscriber for full access.

Forgeworld Best in Show
free warhammer painting tutorials

If you’d prefer to support me on Patreon, please visit: https://www.patreon.com/RichardGray